rocksdb delay write死锁

场景 mongorocks配合rocksdb使用,版本5.1.2是内部分支,合入了一些改动和私有开发改动,这是前提

遇到了delaywrite hang问题,所有线程在blockawait等待主写leader,主写leader失效了或者reset了或者停了,真的需要delaywrite,比如卡在compaction或者flush,没有写入线程等等。下面分析一遍rocksdb社区中遇到的deadlock

这是rocksdb write stall列出的原因 https://github.com/facebook/rocksdb/wiki/Write-Stalls

这是delayWrite部分代码

  if (UNLIKELY(status.ok() && (write_controller_.IsStopped() ||
                               write_controller_.NeedsDelay()))) {
    PERF_TIMER_STOP(write_pre_and_post_process_time);
    PERF_TIMER_GUARD(write_delay_time);
    // We don't know size of curent batch so that we always use the size
    // for previous one. It might create a fairness issue that expiration
    // might happen for smaller writes but larger writes can go through.
    // Can optimize it if it is an issue.
    status = DelayWrite(last_batch_group_size_, write_options);
    PERF_TIMER_START(write_pre_and_post_process_time);
  }


...
// REQUIRES: mutex_ is held
// REQUIRES: this thread is currently at the front of the writer queue
Status DBImpl::DelayWrite(uint64_t num_bytes,
                          const WriteOptions& write_options) {
  uint64_t time_delayed = 0;
  bool delayed = false;
  {
    StopWatch sw(env_, stats_, WRITE_STALL, &time_delayed);
    uint64_t delay = write_controller_.GetDelay(env_, num_bytes);
    if (delay > 0) {
      if (write_options.no_slowdown) {
        return Status::Incomplete();
      }
      TEST_SYNC_POINT("DBImpl::DelayWrite:Sleep");

      mutex_.Unlock();
      // We will delay the write until we have slept for delay ms or
      // we don't need a delay anymore
      const uint64_t kDelayInterval = 1000;
      uint64_t stall_end = sw.start_time() + delay;
      while (write_controller_.NeedsDelay()) {
        if (env_->NowMicros() >= stall_end) {
          // We already delayed this write `delay` microseconds
          break;
        }

        delayed = true;
        // Sleep for 0.001 seconds
        env_->SleepForMicroseconds(kDelayInterval);
      }
      mutex_.Lock();
    }

    while (bg_error_.ok() && write_controller_.IsStopped()) {
      if (write_options.no_slowdown) {
        return Status::Incomplete();
      }
      delayed = true;
      TEST_SYNC_POINT("DBImpl::DelayWrite:Wait");
      bg_cv_.Wait();
    }
  }
  assert(!delayed || !write_options.no_slowdown);
  if (delayed) {
    default_cf_internal_stats_->AddDBStats(InternalStats::WRITE_STALL_MICROS,
                                           time_delayed);
    RecordTick(stats_, STALL_MICROS, time_delayed);
  }

  return bg_error_;
}

分析社区的issue和合入日志

#pr 44751 和主写阻塞现象有点像

分析了这个pr,解决的问题主要是针对write option是no slowdown的,单独设置一下,保证当前write stall不要阻塞设置no slowdown的writer(直接返回status incomplete)Fix corner case where a write group leader blocked due to write stall blocks other writers in queue with WriteOptions::no_slowdown set. 主写stall住还是无法确定

这个改动也挺好玩的,见参考链接2

#issue 12973 delaywrite deadlock

这个issue是cockroachdb遇到的(这个db有机会翻翻代码研究下)

具体版本是4.9之前,使用eventlisener会有死锁的问题。根本原因在于内部没解锁导致的死锁

+	c->ReleaseCompactionFiles(status);
+	*made_progress = true;
	NotifyOnCompactionCompleted(
        c->column_family_data(), c.get(), status, 
        compaction_job_stats, job_context->job_id);        
-	c->ReleaseCompactionFiles(status);	
-	*made_progress = true;

后面还有不恰当配置 max_background_compactions=0导致的wait, 不再赘述

#pr 18844 如果没有bg work 优化sleep时间

这个改动是优化delaywrite逻辑。当没有bg work的时候,也就是bg_compaction_scheduled_ bg_flush_scheduled_等为0就会sleep一段时间,然后进入wait,假如这段时间write_controller可以工作了,还在sleep就不太应该,改成sleep单位时间,每次重新判断条件。这个改动和deadlock无关。

注意,这里测量 write_stall_rate的方法。是个好手段

# fillrandom
# memtable size = 10MB
# value size = 1 MB
# num = 1000
# use /dev/shm
./db_bench --benchmarks="fillrandom,stats" --value_size=1048576 --write_buffer_size=10485760 --num=1000 --delayed_write_rate=XXXXX  --db="/dev/shm/new_stall" | grep "Cumulative stall"

#issue 1235 hit write stall 5

这个issue提到的现象和遇到的完全一致。但是无法定位。

#pr 46156 避免manual flush意外错误造成的wait hang

这个优化是在WaitUntilFlushWouldNotStallWrites基础上的,如果bgworkstopped,有错误的话(比如db只读,肯定会错误),这次处理就返回,不stall wait。否则后台由于错误永远不触发,就会永远hang在这里。由于项目用的代码没有这个优化,理论上不会有这个问题

#pr 46117 避免manual compaction在只读模式下造成的hang

这个错误没看懂怎么就hang了,貌似是shared_ptr没释放导致的?这里以后记得研究一下

#pr 39238 enable_pipelined_write=true可能死锁 15.0修复

这个也是锁两次了,在外部解锁就可以。这个问题db_bench也会遇到

#pr 47519 file-ingest-trgger flush导致deadlock 17.2修复

这个也是WaitUntilFlushWouldNotStallWrites引入的deadlock,进入了writestall WaitForIngestFile 有个#issue 500710 解决方法就是让ingestfile跳过writestall

#pr 148011 IngestExternalFile 导致deadlock

这个原理没有看懂,以后有时间分析一下测试的代码https://github.com/facebook/rocksdb/pull/1480/files

#commit 6ea41f852708cf09d861894d33e1b65cd1d81c45 Fix deadlock when trying update options when write stalls12

这个就是防止write stall期间改动option造成triger混乱 加了个NeedFlushOrCompaction

遇到的问题还在分析中,也有可能不是rocksdb的原因。

参考

  1. https://github.com/facebook/rocksdb/pull/4475
  2. https://github.com/facebook/rocksdb/blob/master/db/db_impl_write.cc#L1242
  3. https://github.com/facebook/rocksdb/issues/1297
  4. https://github.com/facebook/rocksdb/pull/1884
  5. https://github.com/facebook/rocksdb/issues/1235
  6. https://github.com/facebook/rocksdb/pull/4615
  7. https://github.com/facebook/rocksdb/pull/4611/
  8. https://github.com/facebook/rocksdb/pull/3923
  9. https://github.com/facebook/rocksdb/pull/4751
  10. https://github.com/facebook/rocksdb/issues/5007
  11. https://github.com/facebook/rocksdb/pull/1480
  12. https://github.com/facebook/rocksdb/commit/6ea41f852708cf09d861894d33e1b65cd1d81c45
Read More

jit介绍以及使用


JIT概念就不说了

通过这个教程了解jit,https://solarianprogrammer.com/2018/01/12/writing-minimal-x86-64-jit-compiler-cpp-part-2/

代码在这里 https://github.com/sol-prog/x86-64-minimal-JIT-compiler-Cpp/blob/master/part_2/funcall.cpp

一个调用的汇编是这样的

func():
    push rbp
    mov rbp, rsp
    call test()
    pop rbp
    ret

call这个动作要通过代码来实现

func():
    push rbp
    mov rbp, rsp
    movabs rax, 0x0		# replace with the address of the called function
    call rax
    pop rbp
    ret

抄到机器码

0:	55                   	push   rbp
1:	48 89 e5             	mov    rbp,rsp

4:	48 b8 00 00 00 00 00 	movabs rax,0x0
b:	00 00 00
e:	ff d0                	call   rax

10:	5d                   	pop    rbp
11:	c3                   	ret

注意48 b8 ff d0

封装成函数来保存入站出站

namespace AssemblyChunks {
     std::vector<uint8_t>function_prologue {
         0x55,               // push rbp
         0x48, 0x89, 0xe5,   // mov	rbp, rsp
     };
 
     std::vector<uint8_t>function_epilogue {
         0x5d,   // pop	rbp
         0xc3    // ret
     };
 }

最终运行时变成这样

    MemoryPages mp;

    // Push prologue
    mp.push(AssemblyChunks::function_prologue);

    // Push the call to the C++ function test (actually we push the address of the test function)
    mp.push(0x48); mp.push(0xb8); mp.push(test);    // movabs rax, <function_address>
    mp.push(0xff); mp.push(0xd0);                   // call rax

    // Push epilogue and print the generated code
    mp.push(AssemblyChunks::function_epilogue);
    mp.show_memory();

能调用内部,也就能调用写好的函数,更进一步,调用外部输入函数

以及通过下面这些链接学一下,争取抄一个

https://www.clarkok.com/blog/2016/06/13/%E4%BD%BF%E7%94%A8-Xbyak-%E8%BF%9B%E8%A1%8C-JIT/

https://github.com/clarkok/cyan/blob/master/lib/codegen_x64.cpp

https://www.clarkok.com/blog/2016/04/20/Cript%E4%B8%80%E9%97%A8%E8%84%9A%E6%9C%AC%E8%AF%AD%E8%A8%80/

https://github.com/taocpp/PEGTL/blob/66e982bc2baef027fa463e6d633b5a8bcaae9f00/examples/calculator.cc

拓展阅读

  • https://zhuanlan.zhihu.com/p/162111478
  • 有个llvm-clang-jit实现,非常变态 ppt 代码 论文

Read More

为啥不用realloc

只要遇到的问题多,天天都能水博客

主要是这两个题目

https://www.zhihu.com/question/316026652/answer/623343052

https://www.zhihu.com/question/316026215/answer/623342036

和这个提问题的人说了好多条也没说明白(也怪我没说到点子上)

vector不用realloc原因就是realloc只提供memmove但是不提供构造语义,对于not trivial对象是有问题的。和他讨论半天,他还给我举了placement new的例子,提问者不明白realloc和placement new本质区别

realloc这个api是十分邪恶的,为了复用一小块,搞了这个不明不白的api

这api ,不填ptr(NULL) 就是malloc ,不填size(0)就是free

realloc为了复用这小块地方能带来的优势十分有限。并且这个邪恶的api很容易用错。

c程序员不是最喜欢纯粹,一眼能看出来c代码背后做了什么,反对c++这种背后隐藏语义,怎么会喜欢realloc ?这个api可能在背后帮你memmove,如果not trivial,复制就是有问题的。这种心智负担放在使用api的人身上肯定有问题,何况这个api真的太烂了,api caller不了解的话就是个深坑。

参考

  • realloc的代价,别用就好了。 https://stackoverflow.com/questions/5471510/how-much-overhead-do-realloc-calls-introduce
  • 还是不建议用https://stackoverflow.com/questions/25807044/can-i-use-stdrealloc-to-prevent-redundant-memory-allocation
  • realloc 和free-malloc有啥区别,能有机会复用原来的数据,但是这是心智负担啊 https://stackoverflow.com/questions/1401234/differences-between-using-realloc-vs-free-malloc-functions
Read More


分布式事务,xa,2pc,以及rocksdb xa测试

why

科普概念


背景知识: 分布式事务和2pc在参考链接1中有介绍,2pc协议是分布式事务的一个解决方案,2pc主要缺陷

  1. 同步阻塞问题。执行过程中,所有参与节点都是事务阻塞型的。当参与者占有公共资源时,其他第三方节点访问公共资源不得不处于阻塞状态。
  2. 单点故障。由于协调者的重要性,一旦协调者发生故障。参与者会一直阻塞下去。尤其在第二阶段,协调者发生故障,那么所有的参与者还都处于锁定事务资源的状态中,而无法继续完成事务操作。(如果是协调者挂掉,可以重新选举一个协调者,但是无法解决因为协调者宕机导致的参与者处于阻塞状态的问题)
  3. 数据不一致。在二阶段提交的阶段二中,当协调者向参与者发送commit请求之后,发生了局部网络异常或者在发送commit请求过程中协调者发生了故障,这回导致只有一部分参与者接受到了commit请求。而在这部分参与者接到commit请求之后就会执行commit操作。但是其他部分未接到commit请求的机器则无法执行事务提交。于是整个分布式系统便出现了数据部一致性的现象。
  4. 二阶段无法解决的问题:协调者再发出commit消息之后宕机,而唯一接收到这条消息的参与者同时也宕机了。那么即使协调者通过选举协议产生了新的协调者,这条事务的状态也是不确定的,没人知道事务是否被已经提交。

rocksdb 2pc实现 见参考链接2, 3 主要多了prepare操作。这个需求来自myrocks,作为mysql引擎需要xa事务机制myrocks学习可以见参考链接4

2pc实现简单说

txn->Put(...);
txn->Prepare();
txn->Commit();

我一开始是找myrocksxa事务是咋实现的,myrocks引擎在代码storage/myrocks里,但是翻了半天没找到。

找手册,这5有个myrocks配置选项

rocksdb_enable_2pc

  • Description: Enable two phase commit for MyRocks. When set, MyRocks will keep its data consistent with the binary log (in other words, the server will be a crash-safe master). The consistency is achieved by doing two-phase XA commit with the binary log.
  • Commandline: --rocksdb-enable-2pc={0|1}
  • Scope: Global
  • Dynamic: Yes
  • Data Type: boolean
  • Default Value: ON

全程配置allow_2pc就能模拟xa事务吗? 我针对这个改了一版db_bench

dbbench改动,增加allow_2pc配置,如果有这个配置,就true, 调用定义DEFINE_bool就好了(gflags这个库也很好玩,之前吐槽没有命令行的库,孤陋寡闻)

机器32核,脚本参考mark改的,执行脚本

bash r.sh 10000000 60 32 4 /home/vdb/rocksdb-5.14.3/rdb 0 /home/vdb/rocksdb-5.14.3/db_bench

核心代码

#set -x
numk=$1
secs=$2
val=$3
batch=$4
dbdir=$5
sync=$6
dbb=$7

# sync, dbdir, concurmt, secs, dop

function runme {
  a_concurmt=$1
  a_dop=$2
  a_extra=$3
  a_2pc=$4

  rm -rf $dbdir; mkdir $dbdir
  # TODO --perf_level=0

$dbb --benchmarks=randomtransaction --use_existing_db=0 --sync=$sync --db=$dbdir --wal_dir=$dbdir --num=$numk --duration=$secs --num_levels=6 --key_size=8 --value_size=$val --block_size=4096 --cache_size=$(( 20 * 1024 * 1024 * 1024 )) --cache_numshardbits=6 --compression_type=none --compression_ratio=0.5 --level_compaction_dynamic_level_bytes=true --bytes_per_sync=8388608 --cache_index_and_filter_blocks=0 --benchmark_write_rate_limit=0 --write_buffer_size=$(( 64 * 1024 * 1024 )) --max_write_buffer_number=4 --target_file_size_base=$(( 32 * 1024 * 1024 )) --max_bytes_for_level_base=$(( 512 * 1024 * 1024 )) --verify_checksum=1 --delete_obsolete_files_period_micros=62914560 --max_bytes_for_level_multiplier=8 --statistics=0 --stats_per_interval=1 --stats_interval_seconds=60 --histogram=1 --allow_concurrent_memtable_write=$a_concurmt --enable_write_thread_adaptive_yield=$a_concurmt --memtablerep=skip_list --bloom_bits=10 --open_files=-1 --level0_file_num_compaction_trigger=4 --level0_slowdown_writes_trigger=20 --level0_stop_writes_trigger=30 --max_background_jobs=8 --max_background_flushes=2 --threads=$a_dop --merge_operator="put" --seed=1454699926 --transaction_sets=$batch --compaction_pri=3 $a_extra -enable_pipelined_write=false -allow_2pc=$a_2pc
}

for dop in 1 2 4 8 16 24 32 40 48 ; do
for concurmt in 0 1 ; do
for pc in 0 1; do

fn=o.dop${dop}.val${val}.batch${batch}.concur${concurmt}.notrx
runme $concurmt $dop "" $pc >& $fn
q1=$( grep ^randomtransaction $fn | awk '{ print $5 }' )

t=transaction_db
fn=o.dop${dop}.val${val}.batch${batch}.concur${concurmt}.pessim
runme $concurmt $dop --${t}=1 $pc >& $fn
q2=$( grep ^randomtransaction $fn | awk '{ print $5 }' )

t=optimistic_transaction_db
fn=o.dop${dop}.val${val}.batch${batch}.concur${concurmt}.optim
runme $concurmt $dop --${t}=1 $pc >& $fn
q3=$( grep ^randomtransaction $fn | awk '{ print $5 }' )

echo $dop mt${concurmt} allow2pc${pc} $q1 $q2 $q3 | awk '{ printf "%s\t%s\t%s\t%s\t%s\t%s\n", $1, $2, $3, $4, $5, $6 }'

done
done
done

能看到是allow_2pc和和其他项组合的。

测试结果发现数据没有不同

线程数, 是否并发写, 是否开启2pc, 无事务,悲观事务,乐观事务

1       mt0     allow2pc0       39512   22830   21238
1       mt0     allow2pc1       40720   23014   22767
1       mt1     allow2pc0       40539   22683   22131
1       mt1     allow2pc1       36361   21680   23592
2       mt0     allow2pc0       62337   33972   27747
2       mt0     allow2pc1       62725   33941   27553
2       mt1     allow2pc0       62535   33640   31501
2       mt1     allow2pc1       62127   34320   30636
4       mt0     allow2pc0       64864   41878   25235
4       mt0     allow2pc1       65517   41184   26055
4       mt1     allow2pc0       93863   49895   28183
4       mt1     allow2pc1       89718   48726   29027
8       mt0     allow2pc0       79444   52166   26142
8       mt0     allow2pc1       80186   51643   26254
8       mt1     allow2pc0       139753  72598   24661
8       mt1     allow2pc1       136604  73382   25482
16      mt0     allow2pc0       87555   61620   22809
16      mt0     allow2pc1       88055   61812   21631
16      mt1     allow2pc0       193535  98820   21272
16      mt1     allow2pc1       190517  98582   21007
24      mt0     allow2pc0       91718   65400   20736
24      mt0     allow2pc1       92319   64477   20505
24      mt1     allow2pc0       226268  111956  20453
24      mt1     allow2pc1       224815  111901  21005
32      mt0     allow2pc0       88233   65121   20683
32      mt0     allow2pc1       89150   65643   20127
32      mt1     allow2pc0       111623  120843  20626
32      mt1     allow2pc1       230557  120421  20124
40      mt0     allow2pc0       87062   66972   20093
40      mt0     allow2pc1       86632   66814   20590
40      mt1     allow2pc0       113856  60101   20280
40      mt1     allow2pc1       115139  58768   20264
48      mt0     allow2pc0       87093   68637   20153
48      mt0     allow2pc1       87283   68382   19537
48      mt1     allow2pc0       122819  64030   19796
48      mt1     allow2pc1       126721  64090   19907

同事zcw指出这种测试可能不对,我的测试 2pc和悲观乐观事务是组合的形式,这可能并不合理,乐观事务这个参数没意义,allow_2pc只是一个配置,表示rocksdb支持而已,还是要调用prepare才能实现应用的xa,我之前错误的理解allow_2pc配置后会在rocksdb内部有prepare过程(我之前好像看到了)

还是回头看db_bench,看db_bench到底怎么测试的 所有randomtransaction会调用doinsert来真正的执行

定义在transaction_test_util.cc中,果不其然 找到txn->prepare调用

bool RandomTransactionInserter::DoInsert(DB* db, Transaction* txn,
                                         bool is_optimistic) {
	...
  // pick a random number to use to increment a key in each set
    ...
  // For each set, pick a key at random and increment it
    ...
	
  if (s.ok()) {
    if (txn != nullptr) {
      bool with_prepare = !is_optimistic && !rand_->OneIn(10);
      if (with_prepare) {
        // Also try commit without prepare
        s = txn->Prepare();
        assert(s.ok());
        ROCKS_LOG_DEBUG(db->GetDBOptions().info_log,
                        "Prepare of %" PRIu64 " %s (%s)", txn->GetId(),
                        s.ToString().c_str(), txn->GetName().c_str());
        db->GetDBOptions().env->SleepForMicroseconds(
            static_cast<int>(cmt_delay_ms_ * 1000));
      }
      if (!rand_->OneIn(20)) {
        s = txn->Commit();

注意with_prepare这句,这句表明,不是乐观事务,悲观事务,会注意这个取反,会90%调用prepare,调用prepare的事务可以确定肯定是xa事务。所以我需要加个配置项,改成100%的,也应该加个完全不调用prepare的做对照

另外,这个rand_->OneIn(10)实现的很好玩。看测试代码总能发现这些犄角旮旯的需求以及好玩的实现

改动点6

  • 加上transaction_db_xa
  • 所有 FLAGS_transaction_db都得或上FLAGS_transaction_db_xa,避免遗漏,或者不复用,单独再写
  • randomTransaction入口

void RandomTransaction(ThreadState* thread) {
while (!duration.Done(1)) {
  bool success;

  // RandomTransactionInserter will attempt to insert a key for each
  // # of FLAGS_transaction_sets
  if (FLAGS_optimistic_transaction_db) {
    success = inserter.OptimisticTransactionDBInsert(db_.opt_txn_db);
  } else if (FLAGS_transaction_db) {
    TransactionDB* txn_db = reinterpret_cast<TransactionDB*>(db_.db);
    success = inserter.TransactionDBInsert(txn_db, txn_options);
  } else if (FLAGS_transaction_db_xa) {
    TransactionDB* txn_db = reinterpret_cast<TransactionDB*>(db_.db);
    success = inserter.TransactionDBXAInsert(txn_db, txn_options);
  } else {
    success = inserter.DBInsert(db_.db);
  }

加上个flags_transaction_db_xa 对应的option也得注意,要enable allow_2pc

没enable allow_2pc做了个测试,结果真的就是降低了10%,没啥参考价值的感觉。 最后一列是100% prepare

1       mt0     37353   21628   22018   21845
1       mt1     38089   21171   22606   21688
2       mt0     62627   31901   27003   32895
2       mt1     62029   33865   31083   33691
4       mt0     64915   41651   26226   40853
4       mt1     88089   51123   29066   48673
8       mt0     79742   51276   25154   49865
8       mt1     134687  72683   25000   71469
16      mt0     88103   61816   21568   60656
16      mt1     192417  98546   21265   97890
24      mt0     91989   64858   20592   63141
24      mt1     232313  111736  20706   110083
32      mt0     91073   65840   20399   64103
32      mt1     221337  61289   20164   118167
40      mt0     85909   66244   20144   64709
40      mt1     116536  59155   20119   55437
48      mt0     86006   68390   19828   66910
48      mt1     125246  63577   19700   61621

我enable allow2pc 100%prepare 测了一组数据,作为对照,测了一个0%prepare

#set -x
numk=$1
secs=$2
val=$3
batch=$4
dbdir=$5
sync=$6
dbb=$7

# sync, dbdir, concurmt, secs, dop

function runme {
  a_concurmt=$1
  a_dop=$2
  a_extra=$3

  rm -rf $dbdir; mkdir $dbdir
  # TODO --perf_level=0

$dbb --benchmarks=randomtransaction --use_existing_db=0 --sync=$sync --db=$dbdir --wal_dir=$dbdir --num=$numk --duration=$secs --num_levels=6 --key_size=8 --value_size=$val --block_size=4096 --cache_size=$(( 20 * 1024 * 1024 * 1024 )) --cache_numshardbits=6 --compression_type=none --compression_ratio=0.5 --level_compaction_dynamic_level_bytes=true --bytes_per_sync=8388608 --cache_index_and_filter_blocks=0 --benchmark_write_rate_limit=0 --write_buffer_size=$(( 64 * 1024 * 1024 )) --max_write_buffer_number=4 --target_file_size_base=$(( 32 * 1024 * 1024 )) --max_bytes_for_level_base=$(( 512 * 1024 * 1024 )) --verify_checksum=1 --delete_obsolete_files_period_micros=62914560 --max_bytes_for_level_multiplier=8 --statistics=0 --stats_per_interval=1 --stats_interval_seconds=60 --histogram=1 --allow_concurrent_memtable_write=$a_concurmt --enable_write_thread_adaptive_yield=$a_concurmt --memtablerep=skip_list --bloom_bits=10 --open_files=-1 --level0_file_num_compaction_trigger=4 --level0_slowdown_writes_trigger=20 --level0_stop_writes_trigger=30 --max_background_jobs=8 --max_background_flushes=2 --threads=$a_dop --merge_operator="put" --seed=1454699926 --transaction_sets=$batch --compaction_pri=3 $a_extra -enable_pipelined_write=false
}

for dop in 1 2 4 8 16 24 32 40 48 ; do
for concurmt in 0 1 ; do

fn=o.dop${dop}.val${val}.batch${batch}.concur${concurmt}.notrx
runme $concurmt $dop ""  >& $fn
q1=$( grep ^randomtransaction $fn | awk '{ print $5 }' )

t=transaction_db
fn=o.dop${dop}.val${val}.batch${batch}.concur${concurmt}.pessim
runme $concurmt $dop --${t}=1  >& $fn
q2=$( grep ^randomtransaction $fn | awk '{ print $5 }' )

t=optimistic_transaction_db
fn=o.dop${dop}.val${val}.batch${batch}.concur${concurmt}.optim
runme $concurmt $dop --${t}=1  >& $fn
q3=$( grep ^randomtransaction $fn | awk '{ print $5 }' )

t=transaction_db_xa
fn=o.dop${dop}.val${val}.batch${batch}.concur${concurmt}.pessimxa
runme $concurmt $dop --${t}=1  >& $fn
q4=$( grep ^randomtransaction $fn | awk '{ print $5 }' )


fn=o.dop${dop}.val${val}.batch${batch}.concur${concurmt}.pessimnopre
runme $concurmt $dop --${t}=-1  >& $fn #-1 for no prepare
q5=$( grep ^randomtransaction $fn | awk '{ print $5 }' )
echo $dop mt${concurmt} $q1 $q2 $q3 $q4 $q5 | awk '{ printf "%s\t%s\t%s\t%s\t%s\t%s\t%s\n", $1, $2, $3, $4, $5, $6, $7 }'

done
done
线程数 是否并发写 无事务 悲观事务 默认90%prepare allwo_2pc=0 乐观事务 悲观事务 prepare 100% allwo_2pc=1 悲观事务 prepare 0%
1 mt0 40631 22399 23447 22085 23957
1 mt1 40744 21680 23316 21896 24040
2 mt0 59313 33031 27751 32342 36653
2 mt1 60690 33169 30819 33349 34445
4 mt0 54808 41715 25583 37383 46622
4 mt1 74016 50699 29411 48445 52160
8 mt0 68584 48591 25009 45397 59238
8 mt1 94581 64892 24612 70616 83271
16 mt0 86554 60897 22602 58607 74842
16 mt1 186053 96305 21548 93654 121303
24 mt0 91051 63187 20792 61605 79021
24 mt1 209827 111059 20735 106036 144641
32 mt0 90318 64180 20839 62339 77219
32 mt1 185310 113754 20439 108233 84580
40 mt0 87769 65888 20449 63999 80699
40 mt1 119916 60919 19891 56265 88792
48 mt0 86097 67501 19838 66396 81704
48 mt1 119423 61086 19217 59750 86127

markdown 不能调格间距,真破

这个数据作为参考。

另外,有个2pc的bug 值得关注一下 pr https://github.com/facebook/rocksdb/pull/1768

reference

  1. 分布式事务,2pc 3pc https://www.hollischuang.com/archives/681
  2. rocksdb 2pc实现 https://github.com/facebook/rocksdb/wiki/Two-Phase-Commit-Implementation
  3. rocksdb 事务,其中有2pc事务讲解https://zhuanlan.zhihu.com/p/31255678
  4. myrocks deep dive,不错,关于rocksdb的部分提纲摰领https://www.percona.com/live/plam16/sites/default/files/slides/myrocksdeepdive201604-160419162421.pdf
  5. https://mariadb.com/kb/en/library/myrocks-system-variables/
  6. 我的测试改动 https://github.com/wanghenshui/rocksdb/tree/14.3-modified-db-bench
  7. 一个excel小知识,生成的数据如何整理成excel格式,选择这列 ->{数据}菜单 ->分列->按照空格分列,https://zhidao.baidu.com/question/351335222
  8. cockroachdb 用rocksdb 2pc的一个讨论,有时间仔细看看 https://github.com/cockroachdb/cockroach/issues/16948
Read More

immer ,一个不可变数据结构的实现

why

这篇文章是一个cppcon ppt的阅读记录,没法翻墙看视频有点遗憾。有机会再看视频吧。


在ppt中,作者分析了基于数据变动模型的缺点,变动的数据带来各种各样的引用,导致复杂的数据变化。不变的数据模型才是主流。作者不是想要在c++中实现Haskell数据结构模型,是做了个数据结构式的 git ,这就很有意思了。

1552962913756

每个vector都算一个snapshot。

咱们先回想一下git是怎么实现的 ->object一个数组存起来,hash kv存起来,每个object有自己的ref链表,构成object链,也就是分支,每个ref到具体的object(对应commit)也就是快照,不可更改

imm 数组看起来很像了。怎么实现呢?

,引用中有很多链接,是作者的思想来源

这个细节我后面单独开帖子分析吧,一时半会写不完感觉

后面的PPT是作者用immer这个库实现一个mvc模式的软件,一个编辑器

mvc的毛病

改进方案

我感觉这个东西就是Immutable.js的思路?


reference

  • ppt地址,https://sinusoid.es/talks/immer-cppcon17
  • repo地址 https://github.com/arximboldi/immer
  • 作者在ppt中列举了这几个链接
    • purely functional data structure https://www.cs.cmu.edu/~rwh/theses/okasaki.pdf 这本书似乎没有中文版
    • finger tree http://www.staff.city.ac.uk/~ross/papers/FingerTree.html
    • Array Mapped Tries. 2000 https://infoscience.epfl.ch/record/64394/files/triesearches.pdf
    • RRB-Trees: Efficient Immutable Vectors. 2011https://infoscience.epfl.ch/record/169879/files/RMTrees.pdf
    • value identity and state https://www.infoq.com/presentations/Value-Identity-State-Rich-Hickey
  • cpp source https://www.includecpp.org/resources/
  • 之前对编译期正则有所耳闻,看这个ppt的时候发现了这个talk,和网站。很牛逼的工作,提了提案 https://compile-time.re
Read More

gcc提示未知类型pthread_spinlock_t

只要遇到的问题多,天天都能水博客

之前遇到一个问题 link,解决方案是改成-std=gnu99,这是前提

这次我用到了pthread_spinlock,实现个简单的队列,我在redis的makefile中改了,但是编译还是提示

 error: unknown type name 'pthread_spinlock_t'
  pthread_spinlock_t head_lock;

经过我走读makefile,发现 src/.make-settings文件中有缓存之前的编译配置,导致make还是按照 -std=c99 编译的,手动改成-std=gnu99就好了。

注意

  • 这降低了可移植性。(macos貌似没有spinlock?)
  • 需要了解redis makefile流程。可能是大家都觉得简单,没见有人讲这个。

参考

  • gcc使用spinlock https://stackoverflow.com/questions/13661145/using-spinlocks-with-gcc
  • features.h https://github.com/bminor/glibc/blob/0a1f1e78fbdfaf2c01e9c2368023b2533e7136cf/include/features.h#L154-L175

  • __USE_XOPEN2K 定义,实际上和GNU相关。https://stackoverflow.com/questions/33076175/why-is-struct-addrinfo-defined-only-if-use-xopen2k-is-defined
  • 解释__USE_XOPEN2K https://stackoverflow.com/questions/13879302/purpose-of-use-xopen2k8-and-how-to-set-it
  • __GNU_SOURCE___USE_GNU区别https://blog.csdn.net/robertsong2004/article/details/52861078
    • 简单说,有_GNU_SOURCE就有__USE_GNU ,一个内部用,一个外部用,指定编译选项gnu也会启用
    • g++默认编译带GNU,gcc不带
  • 介绍__GNU_SOURCE__USE_GNUhttps://stackoverflow.com/questions/7296963/gnu-source-and-use-gnu
  • 一个-std=c99报错,rwlock也不是标准的,需要pthread.h,也得用gnu https://stackoverflow.com/questions/15673492/gcc-compile-fails-with-pthread-and-option-std-c99
  • spinlock manpage ,注意_POSIX_C_SOURCE >= 200112L http://man7.org/linux/man-pages/man3/pthread_spin_lock.3.html
Read More

硬链接的一些疑问

关于 软连接硬链接inode相关概念,这篇文章深入浅出的阐释了一下, 讲的很好。主要是inode和文件系统的概念不熟,这些概念以及linux的实现,对很多应用都有影响(比如文件分元数据和实际数据,这个设计很多编码方案都这么搞,linux相关设计概念可是个宝藏,读一遍显然是记不住的)

img

简单说,硬链接是复制inode,增加源文件引用计数,不改变数据域,软连接是增加一层,数据域维护整个文件。

找个对应的c++的概念来理解软硬链接,那就是硬链接就像shared_ptr 维护同一个数据,软连接就是raw pointer,或者说weak_ptr(但是没有提升能力) 硬链接总能保证数据是有效的 ,软链接只是数据的一个粗糙的引用语义,文件不存在软连接就无意义了。

查看软链接

 ls -lR / 2> /dev/null | grep /etc/ | grep ^l

硬链接无法查看,只能通过inode判断。

ls -ilh
...
1194549 -rwxr-xr-x    4 root root      768608 May  2  2016 c++
1194549 -rwxr-xr-x    4 root root      768608 May  2  2016 g++
...

但是能查找,列出当前目录下所有硬链接文件

find . -type f -a \! -links 1

` 硬链接的缺陷?`

  • 只能对已存在的文件进行创建
  • 不能交叉文件系统进行硬链接的创建 ,inode会重复。
  • 不能对目录进行创建,只可对文件创建 因为 . 和 ..也是硬链接,文件系统的一部分。如果对目录进行硬链接就环了。

为什么需要硬链接?

参考这个问题和回答

主要需求点是删除一个不会影响其他,又能复用文件

比如上面的例子,c++和g++实际上是同一个文件

再比如busybox命令工具箱,只有一个文件,所有的命令实现都是busybox文件的硬链接。删除文件不影响其他命令

再比如数据备份,直接硬链接,用在数据库备份上,十分迅速,这个文章可以阅读一下。http://www.mikerubel.org/computers/rsync_snapshots/#Incremental

还有文件锁应用, link unlink,pidfile?

Read More

git原理初探

why

详细的文档是非常重要的,对可用性,可维护性都是极大的帮助,比如git文档,比如Rocksdb文档,比如tidb文档, 通过文档学软件要快速。写这种博客就是为了加速这个过程

git 很像文件系统,很多概念可以相互学习补充,git也算是 kv数据库

简单梳理下git功能,实际上git官方教程做的非常好,下面的总结也是官方教程的复述 教程地址https://git-scm.com/book/zh

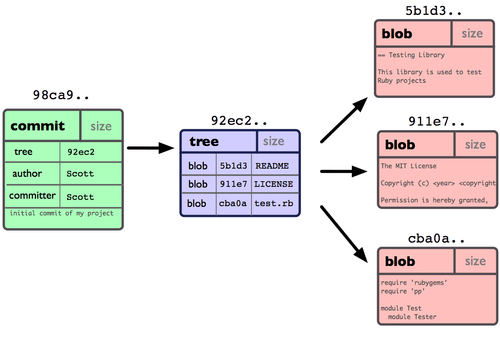
git是怎么存储提交的

img

commit会有tree来维护对应信息,具体在blob

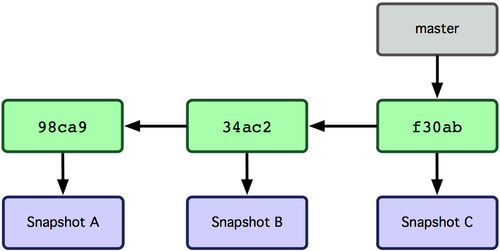
如果有变动,tree维护新的对应关系,commit向前移动,每次commit对应的快照就是所谓的分支起点了(都是指针节点)

img

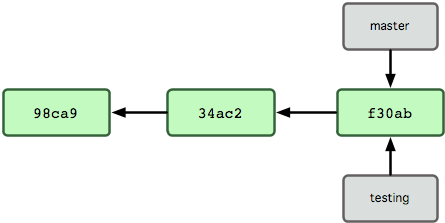
如果创建新分支,就对应着生成新的指针节点(如果已经有分支,不能创建,因为已经有指针占位了)

img

而切换工作指针,就是把HEAD指针放到不同的分支指针上。这样也就能理解HEAD了。

fast forward

考虑一个补丁合入

git checkout -b hotfix
...
git commit ...
git checkout master
git merge hotfix

img

img

master指针转移到hotfix后面。这也就是fast-foward,直接挪到前面。还有一些概念可以见参考链接1中的内容

内部数据结构

.git目录下 主要关注HEADindex 文件,objectsrefs 目录。

  • objects 目录存储所有数据内容
  • refs 目录存储指向数据 (分支) 的提交对象的指针
  • HEAD 文件指向当前分支
  • index 文件保存了暂存区域信息

首先,git算是一个内容寻址的文件系统 ,这个高大上的名词,就是一个kv-store,hash-based,重复的数据(hash相同)地址相同。

index 更像是leveldb里的manifest。记录变更。这些东西都是相通的。

objects包含commit tree blob三种数据类型,编码算法相同,type字段不一样。内部有object数据结构,这三个是派生出来的。

refs就是指针。内部有heads目录,分支头指针。

object数据结构如下

struct object_list {
	struct object *item;
	struct object_list *next;
	const char *name;
};

struct object {
	unsigned parsed : 1;
	unsigned used : 1;
	unsigned int flags;
	unsigned char sha1[20];
	const char *type;
	struct object_list *refs;
	void *util;
};

extern int nr_objs;
extern struct object **objs;

所有对象(tree blob commit tag)都在objs这个数组中,ref添加到object的字段上。多线复杂的提交线就靠ref这个链表来串起来。

具体实现还要挨个走一遍。简单看头文件只能分析个大概。

object目录下有255个目录 00-ff 取的是 算出来的sha值的前两个

比如算出来的是47a013e660d408619d894b20806b1d5086aab03b,会存成objects/47/a013e660d408619d894b20806b1d5086aab03b

有机会走读一下代码更好。

reference

  1. 官方 git内部原理,做的十分好 (就是pro git 2)https://git-scm.com/book/zh/v1/Git-%E5%86%85%E9%83%A8%E5%8E%9F%E7%90%86

  2. git v0.99源码,基本上基础类型都有了https://git.kernel.org/pub/scm/git/git.git/tree/?h=v0.99&id=a3eb250f996bf5e12376ec88622c4ccaabf20ea8

  3. 这个博客讲了一嘴代码,有点乱,找不到源头博客 https://blog.csdn.net/varistor/article/details/10223573

  4. git原理 图文 http://marklodato.github.io/visual-git-guide/index-zh-cn.html

  5. git原理介绍,讲解.git内部结构的 https://zhuanlan.zhihu.com/p/45510461

  6. 内容寻址 文件系统https://en.wikipedia.org/wiki/Content-addressable_storage

  7. 这个博客讲的不错

    1. git对象 http://jingsam.github.io/2018/06/03/git-objects.html
    2. git 引用 http://jingsam.github.io/2018/10/12/git-reference.html
    3. git 对象hashhttp://jingsam.github.io/2018/06/10/git-hash.html
    4. git 存储 http://jingsam.github.io/2018/06/15/git-storage.html
Read More

Valgrind & CallGrind

** TL; DR **

valgrind也可以画函数调用图!鹅妹子樱!

需要安装valgrind和kcachegrind

valgrind --tool=callgrind python xxx.py
kcachegrind

即可

如果kcachegrind实在编不出来(我就是)

可以考虑转成dot文件用graphviz处理

有gprof2dot工具 地址 单文件

python gprof2dot.py --format=callgrind --output=out.dot  callgrind.out.32281
dot -Tsvg out.dot -o graph1.svg

今天知乎上看到一个问题,问python pow是怎么实现的,首先想到的是dis看字节码

>>> import dis
>>> dis.dis(pow)
Traceback (most recent call last):
  File "<stdin>", line 1, in <module>
  File "/usr/lib64/python2.7/dis.py", line 49, in dis
    type(x).__name__
TypeError: don't know how to disassemble builtin_function_or_method objects

只能找翻源码,随手一搜,发现了个解答,利用valgrind找定义,真是个好方法,我以前都是直接翻代码,比较hardcore但是费时间。

网上介绍valgrind,都是什么内存检测工具,实际上还可以做profile, 也可以生成调用关系。

KDE我装了一下午!我曹!各种难装!kde开发太吃苦了吧,搭个环境这么费劲谁还愿意折腾!最后编kcachegrind提示缺少kde4!KDE4安装各种依赖我放弃。

找到了另一个生成图的解决方案,gprof2dot,不多说了

测试代码

for _ in range(10000000):
    pow(2,2)

按照上面的操作之后,画图如下graph1

能看到调用到PyNumber_Power下面就没了。libpython2.7.so.1.0我用各种操作抓这个地址符号,都抓不到。

 readelf -Ws libpython2.7.so.1.0	#这个grep不到结果
 objdump -TC libpython2.7.so.1.0	#这个grep 地址得不到结果
 nm -gC libpython2.7.so.1.0 		#这个空的

代码在这https://github.com/python/cpython/blob/a24107b04c1277e3c1105f98aff5bfa3a98b33a0/Objects/abstract.c#L1030

没仔细研究,应该内部调用的还是glibc

Read More

^