招人啦
10 Oct 2019
老东家,对我挺好,早知道当初留在那边了,宁做鸡头不做凤尾,平台优势不是你个人优势
老东家,对我挺好,早知道当初留在那边了,宁做鸡头不做凤尾,平台优势不是你个人优势
拷贝库到某某目录,执行
export LD_LIBRARY_PATH=$PWD:$LD_LIBRARY_PATH
导入,遇到了一堆类似的错误。做个记录。以后弄清楚
unset LD_LIBRARY_PATH,没说具体原因vim: : ATUSHHH-! : Error 43692576的罪魁祸首 https://stackoverflow.com/questions/31155824/dlopen-in-libc-and-libdl有运行时解决办法,把 __FILE__结果裁剪一下,太弱智了
#define __FILENAME__ (strrchr(__FILE__, '/') ? strrchr(__FILE__, '/') + 1 : __FILE__)
见参考链接,居然还采纳了你敢信??
正确的编译期做法是第二个答案
如果是cmake
set(CMAKE_CXX_FLAGS "${CMAKE_CXX_FLAGS} -D__FILENAME__='\"$(subst ${CMAKE_SOURCE_DIR}/,,$(abspath $<))\"'")
另外@houjw-hx 提到notdir,更清爽,在此补充表示感谢
set(CMAKE_CXX_FLAGS "${CMAKE_CXX_FLAGS} -D__FILENAME__='"$(notdir $<)"'")
确实简单一些。不太了解cmake这些小接口,我都是搜到能对付用的就直接用了。。
如果是makefile
CXX_FLAGS+=-D__FILENAME__='\"$(subst $(SOURCE_PREFIX)/,,$(abspath $<))\"'"
然后把__FILE__替换成__FILENAME__或者把上面的__FILENAME__替换成__FILE__
可能会有告警,但是无关紧要
但是如果设置了-Werror可能会编译不过,需要设定-Wno-builtin-macro-redefined
cmake
set(CMAKE_CXX_FLAGS "${CMAKE_CXX_FLAGS} -Wno-builtin-macro-redefined")
不然会有<command line>:41:9: error: redefining builtin macro [-Werror,-Wbuiltin-macro-redefined] 编译错误
用python脚本拉起后台进程,拉起的代码是这样的
cmds = cmd.split("|")
previous_result, p = None, None
for c in cmds:
    p = subprocess.Popen(shlex.split(c), stdin=previous_result, stdout=subprocess.PIPE, stderr=subprocess.PIPE, close_fds=True)
    previous_result = p.stdout
result, err = p.communicate()
我有两个二进制,一个二进制用的是glog做打印日志,默认输出到stderr,用这个拉起没有问题
另一个二进制使用的print打印日志,默认输出到stdout,用这个拉起会hang住
原因见参考链接1 默认是 shell=True , 如果调用了communicate,表示和stdout交互,除非显式输入EOF,否则会一直等待输入。解决方法就是加上shell=False ,不调用communicate
subprocess.Popen(shlex.split(cmd), stdin=subprocess.PIPE, stdout=subprocess.PIPE,stderr=subprocess.PIPE, close_fds=True, shell=False)
这样输出到stdout的二进制也能拉起。 我考虑过调整日志输出,不输出到stdout, 太麻烦了。作罢
场景是想确定什么时候调用移动构造函数,参考链接有解释
X does not have a user-declared copy constructor,
- X does not have a user-declared copy assignment operator,
- X does not have a user-declared move assignment operator,
- X does not have a user-declared destructor, and
- the move constructor would not be implicitly defined as deleted.
比如下面这段代码
#include <iostream>
#include <tuple>

struct A{
A(){std::cout<<"ctor\n";}
};

int main()
{
   A a;
   A b(std::move(a));
}
无法判断
#include <iostream>
#include <tuple>

struct A{
A(){std::cout<<"ctor\n";}
A(const A& a)=delete;//{std::ignore = a; std::cout<<"copy"<<'\n';}
};

int main(){
   A a;
   A b(std::move(a));
}
这样会提示
prog.cc: In function 'int main()':
prog.cc:15:20: error: use of deleted function 'A::A(const A&)'
    A b(std::move(a));
                    ^
prog.cc:7:1: note: declared here
 A(const A& a)=delete;//{std::ignore = a; std::cout<<"copy"<<'\n';}
当有析构的时候也无法生成move ctor,比如
#include <iostream>
#include <tuple>
#include <memory>
struct A{
A(int a=0):a_(std::make_unique<int>(a)){std::cout<<"ctor\n";}
//A(const A& a)=delete;//{std::ignore = a; std::cout<<"copy"<<'\n';}
//A(A&& a){std::ignore = a; std::cout<<"move"<<'\n';}
~A(){std::cout<<"dtor\n";}
std::unique_ptr<int> a_;
};

int main()
{
   A a;
   A b(std::move(a));
}
/*
prog.cc:16:20: error: use of deleted function 'A::A(const A&)'
    A b(std::move(a));
                    ^
prog.cc:5:8: note: 'A::A(const A&)' is implicitly deleted because the default definition would be ill-formed:
 struct A{
        ^
prog.cc:5:8: error: use of deleted function 'std::unique_ptr<_Tp, _Dp>::unique_ptr(const std::unique_ptr<_Tp, _Dp>&) [with _Tp = int; _Dp = std::default_delete<int>]'
In file included from /opt/wandbox/gcc-5.4.0/include/c++/5.4.0/memory:81:0,
                 from prog.cc:4:
/opt/wandbox/gcc-5.4.0/include/c++/5.4.0/bits/unique_ptr.h:356:7: note: declared here
       unique_ptr(const unique_ptr&) = delete;
*/
由于有dtor,没有默认生成move ctor,而是生成了copy ctor,而unique_ptr的copy ctor是删除的导致错误
如何捕捉编译器调用了什么构造函数?有没有例外情况?
貌似汇编能看出来https://godbolt.org/z/Nn4iod
一个遇到的技巧
场景是这样的,基类需要子类的成员变量来初始化父类
#include <streambuf>  // for std::streambuf
#include <ostream>    // for std::ostream

class fdoutbuf : public std::streambuf {
public:
    explicit fdoutbuf(int fd);
    //...
};

class fdostream : public std::ostream {
protected:
    fdoutbuf buf;
public:
    explicit fdostream(int fd) : buf(fd), std::ostream(&buf) {}
};
这种场景是无法编译通过的,因为需要基类先初始化
但交换初始化列表和基类构造函数的位置
explicit fdostream(int fd) : std::ostream(&buf), buf(fd) {}
这样语义不对,buf十有八九是错的。
需要提前把buf初始化。所以加了一个中间层,把buf放到另外一个基类里,让这个基类先于原来的基类。
class fdoutbuf : public std::streambuf {
public:
    explicit fdoutbuf(int fd);
    //...
};

struct fdostream_pbase {
    fdoutbuf sbuffer;
    explicit fdostream_pbase(int fd) : sbuffer(fd) {}
};

class fdostream : private fdostream_pbase, public std::ostream{
    typedef fdostream_pbase  pbase_type;
    typedef std::ostream     base_type;
public:
    explicit fdostream(int fd): pbase_type(fd), base_type(&sbuffer)  {}
    //...
};
就解决了。
boost提供了一个base_from_member类,用于托管你要抽离出来的字段
用法是这样的
#include <boost/utility/base_from_member.hpp>
#include <streambuf>  // for std::streambuf
#include <ostream>    // for std::ostream

class fdoutbuf : public std::streambuf {
public:
    explicit fdoutbuf(int fd);
    //...
};

class fdostream : private boost::base_from_member<fdoutbuf> , public std::ostream {
    // Helper typedef's
    typedef boost::base_from_member<fdoutbuf>  pbase_type;
    typedef std::ostream                        base_type;

public:
    explicit fdostream(int fd) : pbase_type(fd), base_type(&member) {}
    //...
};
base_from_member有个member字段就是要抽离出来托管的字段。
实际上这个类也没那么复杂,自己写一个base_from_member或者自己写个类似的类,不用base_from_member这种模板继承也是可以的
template < typename MemberType, int UniqueID = 0 >
class boost::base_from_member
{
protected:
    MemberType  member;
    base_from_member();
    template< typename T1 >
    explicit  base_from_member( T1 x1 );
    //...
};
官方的这个例子,真给我看傻了
#include <iostream>
#include <string>
#include <thread>
#include <mutex>
#include <condition_variable>

std::mutex m;
std::condition_variable cv;
std::string data;
bool ready = false;
bool processed = false;

void worker_thread()
{
    // Wait until main() sends data
    std::unique_lock<std::mutex> lk(m);
    cv.wait(lk, []{return ready;});

    // after the wait, we own the lock.
    std::cout << "Worker thread is processing data\n";
    data += " after processing";

    // Send data back to main()
    processed = true;
    std::cout << "Worker thread signals data processing completed\n";

    // Manual unlocking is done before notifying, to avoid waking up
    // the waiting thread only to block again (see notify_one for details)
    lk.unlock();
    cv.notify_one();
}

int main()
{
    std::thread worker(worker_thread);

    data = "Example data";
    // send data to the worker thread
    {
        std::lock_guard<std::mutex> lk(m);
        ready = true;
        std::cout << "main() signals data ready for processing\n";
    }
    cv.notify_one();

    // wait for the worker
    {
        std::unique_lock<std::mutex> lk(m);
        cv.wait(lk, []{return processed;});
    }
    std::cout << "Back in main(), data = " << data << '\n';

    worker.join();
}
为什么在notify_one之前需要unlock?
为什么notify_one不用在锁里?不怕丢吗(当然这个例子里不会丢,一共就俩线程)
notify_one有这么个注释
The effects of
notify_one()/notify_all()and each of the three atomic parts ofwait()/wait_for()/wait_until()(unlock+wait, wakeup, and lock) take place in a single total order that can be viewed as modification order of an atomic variable: the order is specific to this individual condition_variable. This makes it impossible fornotify_one()to, for example, be delayed and unblock a thread that started waiting just after the call tonotify_one()was made.The notifying thread does not need to hold the lock on the same mutex as the one held by the waiting thread(s); in fact doing so is a pessimization, since the notified thread would immediately block again, waiting for the notifying thread to release the lock. However, some implementations (in particular many implementations of pthreads) recognize this situation and avoid this “hurry up and wait” scenario by transferring the waiting thread from the condition variable’s queue directly to the queue of the mutex within the notify call, without waking it up.
Notifying while under the lock may nevertheless be necessary when precise scheduling of events is required, e.g. if the waiting thread would exit the program if the condition is satisfied, causing destruction of the notifying thread’s condition_variable. A spurious wakeup after mutex unlock but before notify would result in notify called on a destroyed object.
这个注释能解释第一个notify_one不加锁
另外,wait必须要有条件,无条件wait容易丢失notify 已经写到官方建议里了 https://github.com/isocpp/CppCoreGuidelines/blob/master/CppCoreGuidelines.md#cp42-dont-wait-without-a-condition
主要是notify_one多线程消费场景,不知道被谁消费了,所以指定某个满足条件的去wait wait一个触发条件。这样配对用
unlocking the mutex before notifying is an optimisation, and not essential. I intentionally didn’t do that, to keep the example simple. There could be a second guideline about that point, but it’s not related to the “always use a predicate” rule. I would object strongly to complicating the example by doing that.
anyway 提前unlock算是个人选择(有优化),不提前unlock也没啥大的影响
说句题外话
最近在看一个时间队列实现,这个cond var用的让我有点迷惑
class TimerQueue {
public:
    TimerQueue() {
        m_th = std::thread([this] { run(); });
    }

    ~TimerQueue() {
        cancelAll();
        add(0, [this](bool) { m_finish = true; });
        m_th.join();
    }

    uint64_t add(int64_t milliseconds, std::function<void(bool)> handler) {
        WorkItem item;
        item.end = Clock::now() + std::chrono::milliseconds(milliseconds);
        item.handler = std::move(handler);

        std::unique_lock<std::mutex> lk(m_mtx);
        uint64_t id = ++m_idcounter;
        item.id = id;
        m_items.push(std::move(item));
        lk.unlock();

        // Something changed, so wake up timer thread
        m_checkWork.notify();
        return id;
    }
  ....
注意是先lk.unlock再notify,这个unlock有必要么?
后来发现是用cond var封装了一个 信号量,自己用内部的mtx。和这个没啥关系。
这个代码给我整晕了。rocksdb的timerqueue抄了这个,但是体验没那么迷糊
layout: post title: tcp keepalive categories: [linux] tags: [tcp,keepalive,c]
int opt_val = 1;
setsockopt(sock_fd, SOL_SOCKET, SO_KEEPALIVE, &opt_val, sizeof(opt_val))
启用后,socket 默认的检测参数使用内核参数,使用 sysctl -a|grep tcp_keepalive查看,或者使用以下命令查看:
cat /proc/sys/net/ipv4/tcp_keepalive_time
cat /proc/sys/net/ipv4/tcp_keepalive_intvl
cat /proc/sys/net/ipv4/tcp_keepalive_probes
修改内核的参数可以使用 vim /etc/sysctl.conf 修改,然后使用 sysctl -p 应用
如果需要设置自定义的心跳参数,则需要使用 setsockopt 函数设置:
setsockopt (sock_fd,  SOL_TCP,  TCP_KEEPIDLE,  &idle, sizeof(idle))
setsockopt (sock_fd,  SOL_TCP,  TCP_KEEPINTVL,  &intvl, sizeof(intvl))
setsockopt (sock_fd,  SOL_TCP,  TCP_KEEPCNT,  &cnt,  sizeof(cnt))
以上几个参数含义为:
三个角色
优化角色
一图流
Source file: mmd/raft-v1.mmd:
learner和follower互相转换较为复杂,不如下线重新上线这种添加更干净一些
可以看etcd 的那个learner在角色变换中的处理,太恶心了
是beansdb的一些资料整理和总结
转自这里 http://sunisdown.me/gobeansdb-jia-gou-she-ji.html
我在刚刚接手 GoBeansDB 的时候,想过这个问题。既然有那么多优秀的数据库系统,为什么豆瓣还需要自己重新实现一套 k/v 存储? 这个问题可以拆分成两个方面,一个是为什么要用 K/V 数据库。一个是为什么要自己造轮子。
上面四点可以排除掉类似 MySQL 这种传统的关系型数据库。
排除掉传统的关系行数据库之后,就需要对比现存的 K/V 数据库。
现在比较流行的 K/V 数据库有 LevelDB , MongoDB ,还有 Cassandra ,现在看来这些项目都足够成熟。但是如果追溯到 BeansDB 项目最开始的时候,也就是 2012 年的时候,那个时间点并没有太好的选择。即使现在看来,除了 Cassandra 之外,像 LevelDB, MongoDB 也不能满足我们的目标:
这 5 点也可以排除调 MongoDB 与 LevelDB 。
当然上面这些都是我做的推断,但是这些应该都不是最主要的原因。最主要的原因应该是豆瓣的工程师文化比较好,鼓励工程师去寻找一个最贴合业务的解决方案,并且这个工程师的团队还足够强,两者缺一不可。如果没有很强的工程师文化,可能会直接引入开源的解决方案,虽然不一定合适,但是应该足够解决痛点。如果工程师实力不够,也就没有能力去自己实现一套类似的系统。而且与其去引入一个复杂的,自己无法完全掌控的开源项目,不如自己实现一套贴合业务的,简单的系统。这样内部可以根据业务的需要来作调整,同时自己实现一个系统也比完全掌握一个庞大的开源项目要简单。一旦出现问题也比较容易找到问题所在。
BeansDB 是用 C 来实现的,为什么现在改用 Go 来实现?
GoBeansDB 是基于 Dynamo 与 Bitcask 两篇论文来做的实现,这里优先讨论基于 Bitcask 实现的存储引擎。Bitcask 有一个缺点在于所有的 key 值都必须放在内存里面,GoBeansDB 这这个基础之上做了一些优化,绕过了 Bitcask 这个痛点。
GobeansDB 的存储有有两个比较重要的组成部分,一个是索引(htree),一个是数据文件(data)。索引与数据文件组成 Bucket。Bucket 的概念类似与关系行数据库里面的 table,在 GoBeansDB 的实现中就是给一个 Bucket 分配一个文件夹,这个文件夹下面放着相关的数据。每个 Bucket 下面一次只允许打开一个文件。打开的这个文件会一直保持打开的状态,一直等到追加到活跃文件超出阈值。文件超出阈值之后就关闭,然后新建一个新的继续添加。data 文件一旦关闭之后,文件就转换成为不活跃的数据文件。无法再往这个 data 文件上面追加数据。

状态为 active 的数据文件只做追加操作,这样连续的写入操作也不会明显增加磁盘的 IO 使用量。这种设计也极大的简化了数据的写入操作。
上面的图简单描述了 Bucket 内部文件的架构,每条数据里面包含TS(TimeStamp),Flag,Ver(Version),ValueHash,RecSize(单条记录的主要内容的大小),Value,crc(key,value,header 的 crc),ksz(Key Size),vsz(Value Size),pos(Position,这条记录在文件中的位置),Header。
当插入新数据的时候,直接在文件尾部添加这种结构的数据。删除操作是对原有的数据做更新操作,并将 Ver 绝对值+1,转变为负数。
在文件写入完成之后,需要更新内存里面的数据结构,也就是前面提到的 HTree,HTree 是一个 Hash Tree,结构如下
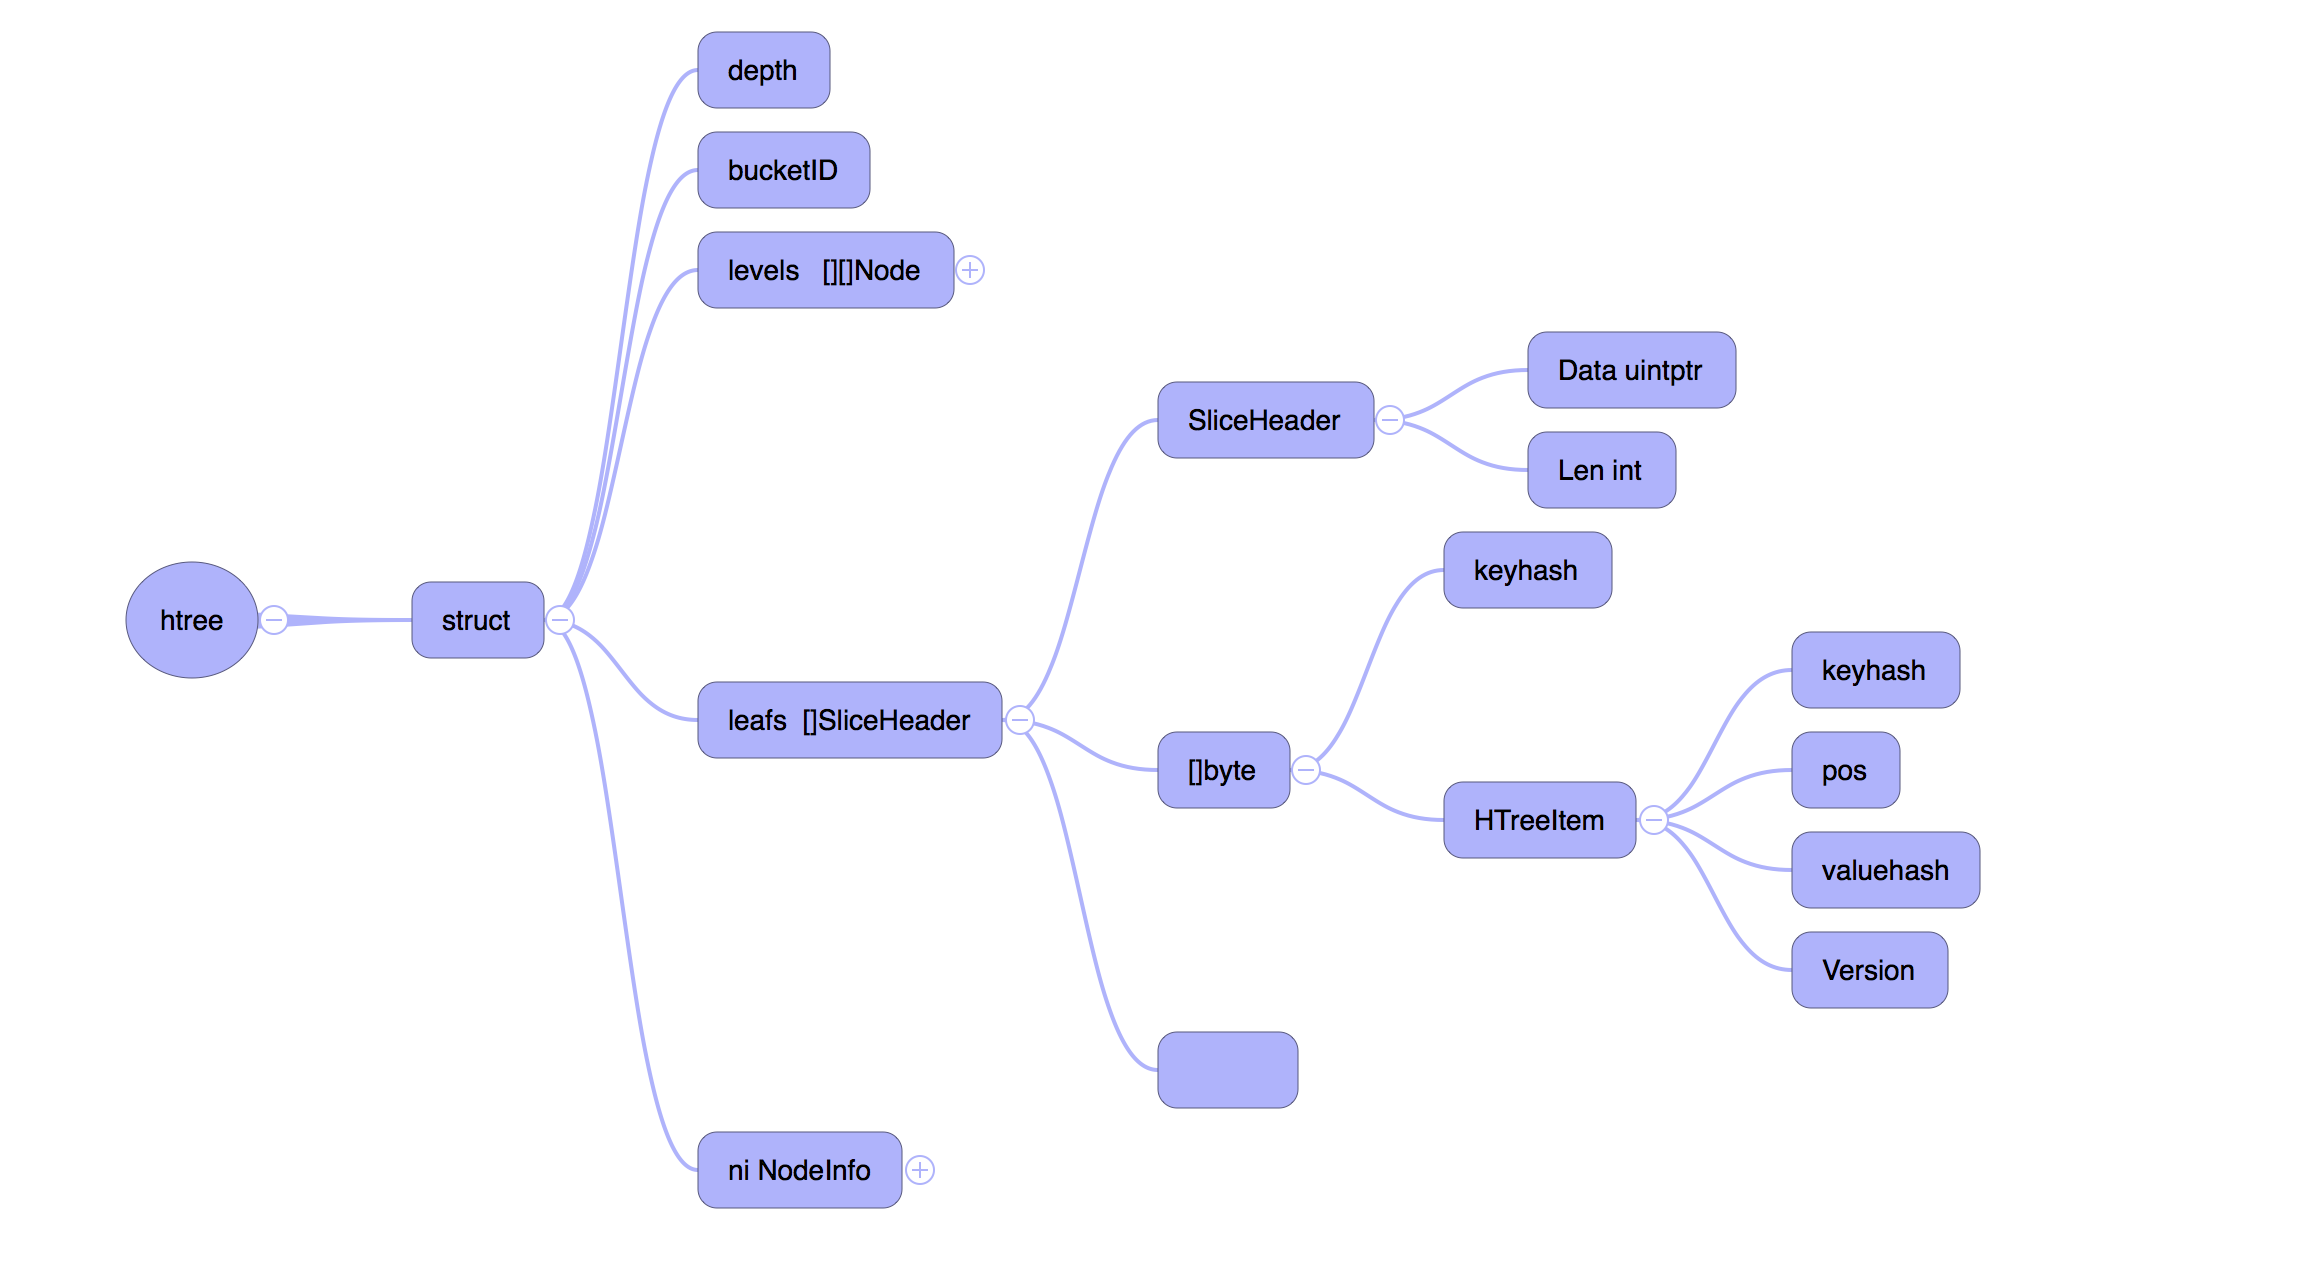
levels 表示真实的树状结构, leafs 是树的叶子,保存着真实的数据。

这种数据结构下读取一个值也非常简单,大多数情况下最多只需要一次 seek 。我们首先在 Htree 中通过 levels 找到 key 对应的 leafs , 然后通过 leafs 里面的报错的 Pos 来拿到文件编号(chunkID)以及 offset,这样就可以通过文件编号(chunkID)和 offset 来拿到保存的数据。在很多情况下文件系统的缓存会让这个读操作比预期的要快。
到这里关于 GoBeansDB wirte/delete/read 相关的操作都已经基本完成。但是仅仅这样还不能完备。
GoBeansDB 的模型非常简单,write/delete 操作都是在文件尾部追加新的数据,这样存在一个问题就是占用的磁盘空间比真实的数据要多。所以我们引入了 GC 机制来回收垃圾,释放内存与磁盘空间。
在 GoBeansDB 中,通过增量 GC 来减小 GC 的开销。xiufeng 通过分析 BeansDB 的日志,统计出一条新写入的数据,修改操作基本在写入之后的 7 天之内,所以我们保留 7 天之内的新数据不做 GC。然后在每天晚上,访问量较低的时候,分批做增量 GC。
GC 的过程是将 datafile 里面已经过时的数据清除掉,比如旧版本的value,已经标记为删除掉的key。
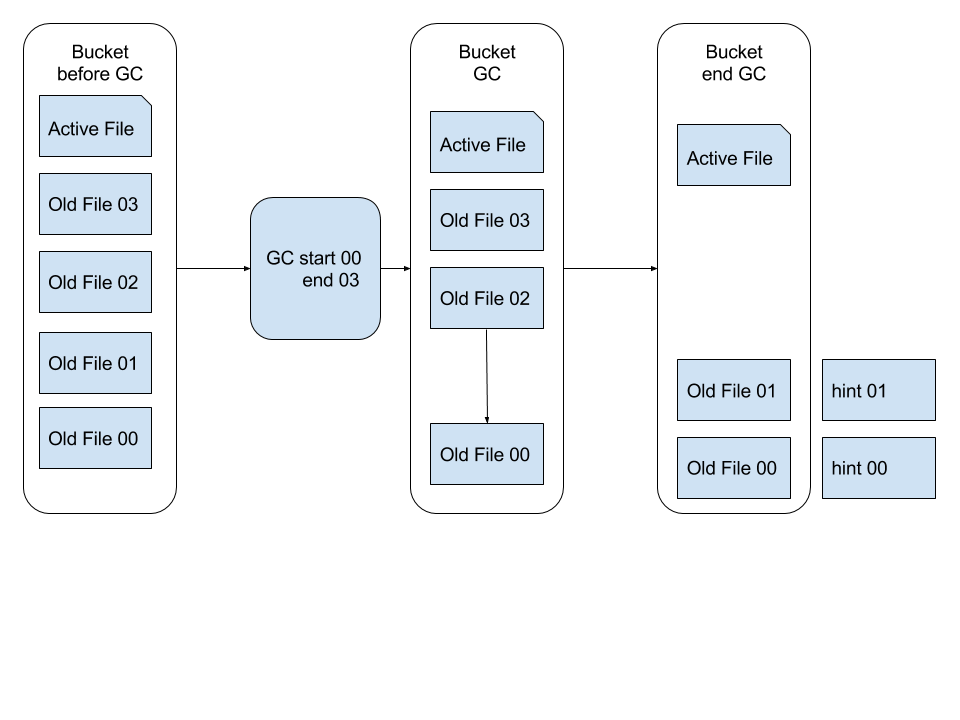
如 上图所示,GC 会读取状态为不活跃的数据文件,用其中存活的数据或者最新版本的数据生成一份新的数据文件,同时为这个新的数据文件创建一个 hint file。
main -> 各种init -> store = hs_open(dbhome, height, before_time, settings.num_threads); -> bc_scan -> scanHintFile根据hintRecord能重建 hashtree -> thread_init(settings.num_threads); -> pthread_create(&flush_id, NULL, do_flush, NULL) -> loop_run(settings.num_threads);
hs是重点 应该代表hashtree,会根据hashtree的高度创建 2 的 4* 高度次方个bitcask实例。然后各个实例下面来进行实际的动作
inline int get_index(HStore *store, char *key)
{
    if (store->height == 0) return 0;
    uint32_t h = fnv1a(key, strlen(key));
    return h >> ((8 - store->height) * 4);
}
hstore有锁
struct t_hstore {
    int height, count;
    time_t before;
    int scan_threads;
    int op_start, op_end, op_limit; // for optimization
    Mgr* mgr;
    pthread_mutex_t locks[NUM_OF_MUTEX];
    Bitcask* bitcasks[];
};
这个锁只在hs_append和hs_incr上会加锁,因为涉及到get
bitcask内部有三个锁
struct bitcask_t {
    uint32_t depth, pos;
    time_t before;
    Mgr    *mgr;
    HTree  *tree, *curr_tree;
    int    last_snapshot;
    int    curr;
    uint64_t bytes, curr_bytes;
    char   *write_buffer;
    time_t last_flush_time;
    uint32_t    wbuf_size, wbuf_start_pos, wbuf_curr_pos;
    pthread_mutex_t flush_lock, buffer_lock, write_lock;
    int    optimize_flag;
};
本身是一个服务而不是一个嵌入式的库,锁多可以理解。
hs_set -> get_index -> bc_set -> pthread_mutex_lock(&bc->write_lock); -> ht_get 根据key查hashtree拿到value的指针。可以比较value hash,如果hash相同,区分不出,那就去拿到实际的value比较value bc_get(bc, key); -> 有版本信息,ht_add(bc->tree, key, it->pos, it->hash, ver); 更新版本 通常逻辑,走append -> pthread_mutex_lock(&bc->buffer_lock); -> 如果空间不够走bc_flush -> 重新分配buffer -> bc_rotate -> build_thread -> build_hint -> ht_add(bc->curr_tree, key, pos, hash, ver); 这里tree和curr_tree都更新了。为啥需要两个hashtree? -> tree也有个锁 pthread_mutex_lock(&tree->lock);
hs_get -> get_index -> bc_get DataRecord -> ht_get -> check_key -> 锁tree -> get_item_hash 虽然是hashtree,但是get没用上hash,前面用到了,tree内部还是对比key
hashtree 构成,Node -> Data -> Item
struct t_item {
    uint32_t pos;
    int32_t  ver;
    uint16_t hash;
    uint8_t  length;
    char     key[1];
};
如何定位到Node?
通过build_hint生成hint -> ht_visit(tree, collect_items, &p); -> lock, visit node, -> collect_items -> write_hint_file(p.buf, p.curr, hintpath);
typedef struct hint_record {
    uint32_t ksize:8;
    uint32_t pos:24;
    int32_t version;
    uint16_t hash;
    char key[NAME_IN_RECORD]; // allign
} HintRecord;
hint文件是key hash pos,通过这个就构建出hashtree了
void scanHintFile(HTree* tree, int bucket, const char* path, const char* new_path)
{
    HintFile* hint = open_hint(path, new_path);
    char *p = hint->buf, *end = hint->buf + hint->size;
    while (p < end) {
        HintRecord *r = (HintRecord*) p;
        p += sizeof(HintRecord) - NAME_IN_RECORD + r->ksize + 1;
        if (p > end){
            break;
        }
        uint32_t pos = (r->pos << 8) | (bucket & 0xff);
        if (r->version > 0)
            ht_add2(tree, r->key, r->ksize, pos, r->hash, r->version);
        else
            ht_remove2(tree, r->key, r->ksize);
    }
    close_hint(hint);
}
这个hint用rocksdb存也是可以的,scan一遍就重新构造出来了。问题在于什么时候hint文件落地?会存在hashtree和hint不对应的场景么?
越看越眼熟。这和blobdb差不太多吧,无非索引有差别,一个是hashtree一个是skiplist
如果把rocksdb用hashtable替换skiplist我估计差不多吧