hashmap benchmar overivew资料待整理
这里把搜集的一些资料列举一下,后续做整理
- https://martin.ankerl.com/2019/04/01/hashmap-benchmarks-01-overview/
- https://github.com/martinus/map_benchmark
这里把搜集的一些资料列举一下,后续做整理
先说下glibc自带的ptmalloc
多线程支持
ptmalloc内存管理
用户请求分配的内存在ptmalloc中使用chunk表示, 每个chunk至少需要8个字节额外的开销。 用户free掉的内存不会马上归还操作系统,ptmalloc会统一管理heap和mmap区域的空闲chunk,避免了频繁的系统调用。
ptmalloc 将相似大小的 chunk 用双向链表链接起来, 这样的一个链表被称为一个 bin。Ptmalloc 一共 维护了 128 个 bin,并使用一个数组来存储这些 bin(图就像二维数组,或者std::deque底层实现那种感觉,rocksdb arena实现也这样的)
ptmalloc的缺陷
这里的问题在于arena是全局的 jemalloc和tcmalloc都针对这个做优化
tcmalloc的数据结构看参考链接
主要的优化 size分类,TheadCache
小对象分配
CentralCache分配管理
大对象(>32K)先4k对齐后,从CentralCache中分配。 CentralCache维护的PageHeap如下图所示, 数组中第256个元素是所有大于255个页面都挂到该链表中。
回收
jemalloc
与tcmalloc类似,每个线程同样在<32KB的时候无锁使用线程本地cache。
Jemalloc在64bits系统上使用下面的size-class分类:
categories | Spacing | Size |
---|---|---|
Small | 8 | [8] |
16 | [16, 32, 48, …, 128] | |
32 | [160, 192, 224, 256] | |
64 | [320, 384, 448, 512] | |
128 | [640, 768, 896, 1024] | |
256 | [1280, 1536, 1792, 2048] | |
512 | [2560, 3072, 3584] | |
Large | 4 KiB | [4 KiB, 8 KiB, 12 KiB, …, 4072 KiB] |
Huge | 4 KiB | [4 MiB, 8 MiB, 12 MiB, …] |
small/large对象查找metadata需要常量时间, huge对象通过全局红黑树在对数时间内查找。
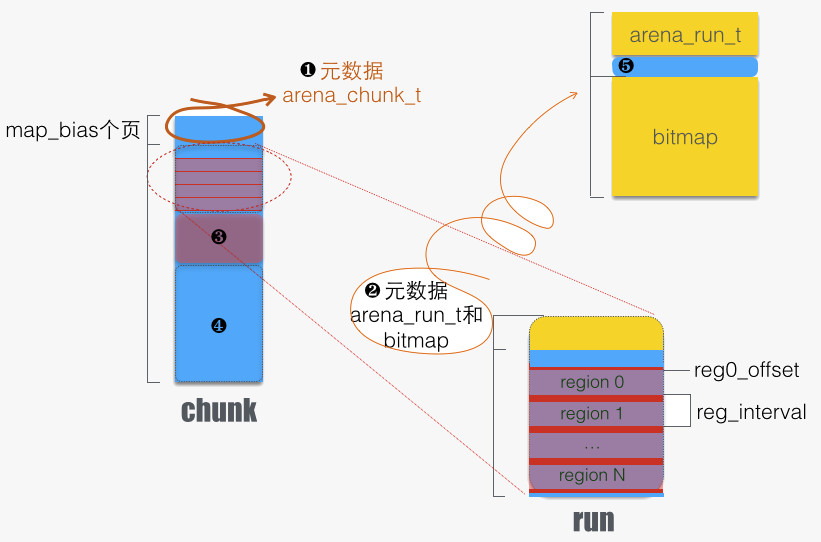
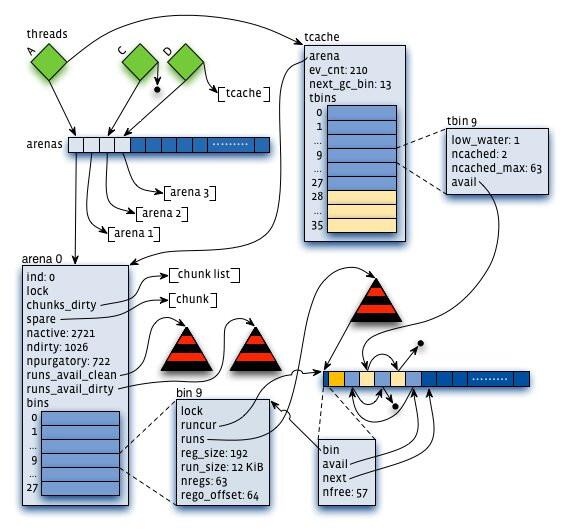
虚拟内存被逻辑上分割成chunks(默认是4MB,1024个4k页),应用线程通过round-robin算法在第一次malloc的时候分配arena, 每个arena都是相互独立的,维护自己的chunks, chunk切割pages到small/large对象。free()的内存总是返回到所属的arena中,而不管是哪个线程调用free()。
结构图
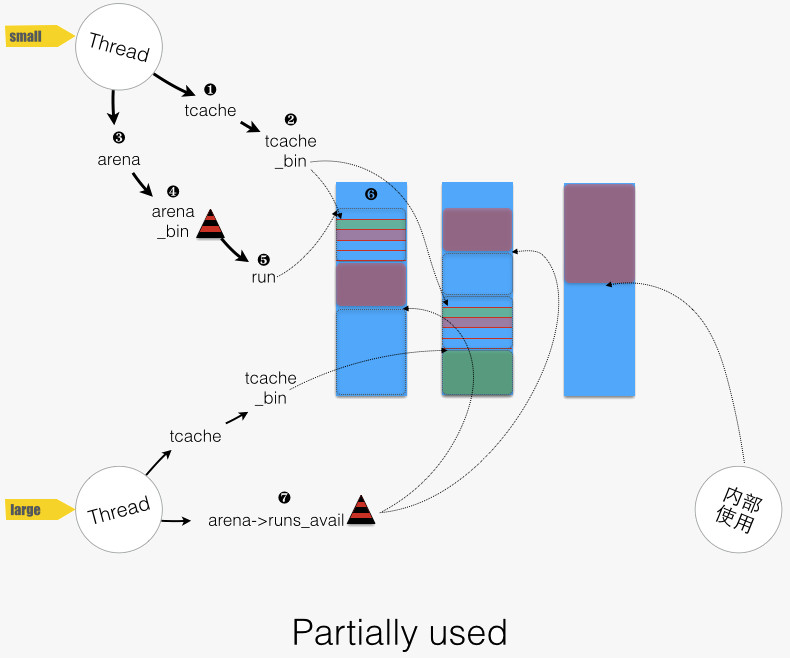
jemalloc 的内存分配,可分成四类:
简而言之,就是:
小内存(small class): 线程缓存bin -> 分配区bin(bin加锁) -> 问系统要 中型内存(large class):分配区bin(bin加锁) -> 问系统要 大内存(huge class): 直接mmap组织成N个chunk+全局huge红黑树维护(带缓存)
回收流程大体和分配流程类似,有tcache机制的会将回收的块进行缓存,没有tcache机制的直接回收(不大于chunk的将对应的page状态进行修改,回收对应的run;大于chunk的直接munmap)。需要关注的是jemalloc何时会将内存还给操作系统,因为ptmalloc中存在因为使用top_chunk机制(详见华庭的文章)而使得内存无法还给操作系统的问题。目前看来,除了大内存直接munmap,jemalloc还有两种机制可以释放内存:
这里把搜集的一些资料列举一下,后续做整理
nedmallochttps://www.nedprod.com/programs/portable/nedmalloc/
tcmalloc和jemalloc比较https://stackoverflow.com/questions/7852731/c-memory-allocation-mechanism-performance-comparison-tcmalloc-vs-jemalloc
结论放这里
If I remember correctly, the main difference was with multi-threaded projects.
Both libraries try to de-contention memory acquire by having threads pick the memory from different caches, but they have different strategies:
jemalloc
(used by Facebook) maintains a cache per threadtcmalloc
(from Google) maintains a pool of caches, and threads develop a “natural” affinity for a cache, but may changeThis led, once again if I remember correctly, to an important difference in term of thread management.
jemalloc
is faster if threads are static, for example using poolstcmalloc
is faster when threads are created/destructedThere is also the problem that since
jemalloc
spin new caches to accommodate new thread ids, having a sudden spike of threads will leave you with (mostly) empty caches in the subsequent calm phase.As a result, I would recommend
tcmalloc
in the general case, and reservejemalloc
for very specific usages (low variation on the number of threads during the lifetime of the application)
ruby使用各种malloc的benchmark,有点参考价值http://engineering.appfolio.com/appfolio-engineering/2018/2/1/benchmarking-rubys-heap-malloc-tcmalloc-jemalloc
repo https://github.com/jemalloc/jemalloc wiki值得看下
一个使用例子 https://www.jianshu.com/p/5fd2b42cbf3d
这是另一个测试,不过HN上有人说测得不合理http://ithare.com/testing-memory-allocators-ptmalloc2-tcmalloc-hoard-jemalloc-while-trying-to-simulate-real-world-loads/
jemalloc设计者的博客,很多文章。是个狠人http://branchtaken.net/blog/2008/07/25/treaps-versus-red-black-trees.html
glibc malloc的调优文档https://www.gnu.org/software/libc/manual/html_node/Memory-Allocation-Tunables.html
理解glibc malloc https://sploitfun.wordpress.com/2015/02/10/understanding-glibc-malloc/
论文https://people.freebsd.org/~jasone/jemalloc/bsdcan2006/jemalloc.pdf
malloc 概论 必读http://blog.reverberate.org/2009/02/one-malloc-to-rule-them-all.html
了解学习allocator
源标题 An Allocator is a Handle to a Heap by Arthur O’Dwyer
object有地址,value无地址。
c++14 以前:stateless allocator
想要个statefull allocator怎么办 以前的方法是实现一个allocator
template <class T>
struct Bad{
alignas(16) char data[1024];
size_t used = 0;
T* allocate(size_t){
auto k = n*sizeof(T);
used+=k;
return(T*)(data+used-k);
}
};
现在的方法是->std::pmr::polymorphic_allocator + memory_resource
可以继承memory_resource 来实现statefull, 从allocator中拆分出来
template <class T>
struct trivial_res : std::pmr::memory_resource {
alignas(16) char data[1024];
size_t used = 0;
T* allocate(size_t){
auto k = n*sizeof(T);
used+=k;
return(T*)(data+used-k);
}
};
trivial_res<int> mr;
std::vector<int, polymorphic_allocator<int>> vec(&mr);
allocator本身还是值语义的,不需要考虑拷贝移动背后的危险(statefull allocator就会有这种问题)
语义上只负责分配,(调用全局new delete)就是个singleton
std::pmr::memory_resource就是为了提供存储空间,剩下的由allocator调用
std::pmr::new_delete_resource 实际上就是个singleton::get
std::pmr::polymorphic_allocator只要持有memory_resource的指针就行了
还要注意,这里allocator仅能有copy语义而不能有move语义。见参考链接2
之前一直不理解rebind 作者列出了一个rebindable的例子 https://wandbox.org/permlink/mHrj7Y55k3Gqu4Q5
实际上是各种容器内部实现的区别,比如vector<int>
内部allocator分配的T就是int,但是 list<T>
就不一样了,内部实际上是Node<int>
由于这种原因才有不同的allocator构造接口(rebind接口)
要让allocator和T无关,这就回到了 std::pmr这个上了,干掉背后的类型,虚函数来搞,T交给背后的memory_resource,看起来好像这里的allocator就起到了一个指针的作用 allocator_traits<AllocT>::pointer
可能是T*,也可能是藏了好几层的玩意儿,fancy pointer,比如boost::interprocess::offset_ptr<T>
此外,这个指针还有问题,比如他到底在堆还是在栈中?有可能都在,也就是fancy pointer场景,比如std::list<T>
声明一个局部对象,考虑list的内部实现,头结点是对象本身持有的,分配在栈上,但是其他链表结点是在堆中的。
这个话题太长了,Bob Steagall 也有个PPT,100多页,还要看看消化一下这里暂时跳过
allocator的move问题 https://cplusplus.github.io/LWG/issue2593
关于fancy pointer的深度讨论http://www.open-std.org/jtc1/sc22/wg21/docs/papers/2017/p0773r0.html
关于allocator的讨论https://www.zhihu.com/question/274802525
rebind的讨论https://bbs.csdn.net/topics/200079053 结论https://www.cnblogs.com/whyandinside/archive/2011/10/23/2221675.html
连接中的rebind指的语义上的rebind,作者的rebind例子是是这样的 注意rebind copy ctor和move ctor
#include <list>
#include <vector>
#include <memory>
#include <stdio.h>
namespace Stateless {
template<class T>
struct A {
A() { puts("default-constructed"); }
A(const A&) { puts("copy-constructed"); }
A(A&&) { puts("move-constructed"); }
void operator=(const A&) { puts("copy-assigned"); }
void operator=(A&&) { puts("move-assigned"); }
template<class U>
A(const A<U>&) { puts("rebind-copy-constructed"); }
template<class U>
A(A<U>&&) { puts("rebind-move-constructed"); }
using value_type = T;
T *allocate(size_t n) { return std::allocator<T>{}.allocate(n); }
void deallocate(T *p, size_t n) { return std::allocator<T>{}.deallocate(p, n); }
};
static_assert(std::allocator_traits<A<int>>::is_always_equal::value == true);
} // namespace Stateless
namespace Stateful {
template<class T>
struct A {
int i = 0;
A() { puts("default-constructed"); }
A(const A&) { puts("copy-constructed"); }
A(A&&) { puts("move-constructed"); }
void operator=(const A&) { puts("copy-assigned"); }
void operator=(A&&) { puts("move-assigned"); }
template<class U>
A(const A<U>&) { puts("rebind-copy-constructed"); }
template<class U>
A(A<U>&&) { puts("rebind-move-constructed"); }
using value_type = T;
T *allocate(size_t n) { return std::allocator<T>{}.allocate(n); }
void deallocate(T *p, size_t n) { return std::allocator<T>{}.deallocate(p, n); }
};
static_assert(std::allocator_traits<A<int>>::is_always_equal::value == false);
} // namespace Stateful
template<template<class...> class CONTAINER>
void test()
{
puts(__PRETTY_FUNCTION__);
puts("--------Stateless:--------");
{
using namespace Stateless;
puts("--- during default-construction:");
CONTAINER<int, A<int>> a;
puts("--- during copy-construction:");
CONTAINER<int, A<int>> b(a);
puts("--- during move-construction:");
CONTAINER<int, A<int>> c(std::move(a));
puts("--- during destructions:");
}
puts("--------Stateful:--------");
{
using namespace Stateful;
puts("--- during default-construction:");
CONTAINER<int, A<int>> a;
puts("--- during copy-construction:");
CONTAINER<int, A<int>> b(a);
puts("--- during move-construction:");
CONTAINER<int, A<int>> c(std::move(a));
puts("--- during destructions:");
}
}
int main()
{
test<std::list>();
test<std::vector>();
}
看到这里或许你有建议或者疑问或者指出我的错误,我的邮箱wanghenshui@qq.com 先谢指教。或者到博客上提issue 我能收到邮件提醒。
在semimap的ppt里见到了std::launder,一个c++17引入的函数,学习了解一下
看提案就能大概了解std::launder到底是为了啥,解决掉placement new和reinterpret_cast在const场景下带来的未定义行为,比如这个例子
struct X { const int n; };
union U { X x; float f; };
void tong() {
U u = 1;
u.f = 5.f; // OK, creates new subobject of 'u'
X *p = new (&u.x) X {2}; // OK, creates new subobject of 'u'
assert(p->n == 2); // OK
assert(*std::launder(&u.x.n) == 2); // OK
// undefined behavior, 'u.x' does not name new subobject
assert(u.x.n == 2);
}
如果内部有const,可能编译器会优化掉访问值的行为,std::launder就是为了解决掉这个场景,阻止编译器优化
std::launder
acts as an optimization barrier that prevents the optimizer from performing constant propagation.
实现,就是一层阻止优化的封装,参考链接3中详细列举了gcc实现以及相应的问题
folly的实现见参考链接5,因为是应用,就封装了一层
template <typename T>
FOLLY_NODISCARD inline T* launder(T* in) noexcept {
#if FOLLY_HAS_BUILTIN(__builtin_launder) || __GNUC__ >= 7
// The builtin has no unwanted side-effects.
return __builtin_launder(in);
#elif __GNUC__
// This inline assembler block declares that `in` is an input and an output,
// so the compiler has to assume that it has been changed inside the block.
__asm__("" : "+r"(in));
return in;
#elif defined(_WIN32)
// MSVC does not currently have optimizations around const members of structs.
// _ReadWriteBarrier() will prevent compiler reordering memory accesses.
_ReadWriteBarrier();
return in;
#else
static_assert(
false, "folly::launder is not implemented for this environment");
#endif
}
对于gcc环境,看asm那条就懂了,优化让他强制访问地址而不是读const
llvm的实现见参考链接6,比较复杂,就不列代码了
演讲人是Stephan T. Lavavej ,负责msvc stl的
这个演讲的主题就是Class template argument deduction,简称CTAD,之前也接触过。借这个ppt彻底顺一下
简而言之这个c++17新特性给了类模板像函数模板一样的推导能力,可以省去指定参数,让编译器帮你推导
std::vector v{2}; //推导成vector<size_t>
lock_guard l(mtx); //推导成lock_guard<mutex>
还有pair,tuple 以及智能指针,以及guard,从此make_函数基本可以下岗
对比函数模板的推导,为什么类模板之前没有推导,以pair举例
基本语法 初始化(){},直接初始化和赋值初始化
应用的场景
容器,包括pair和tuple
容器的范围初始化
list<pair<int, string>> lst;
...;//添加元素等等
vector v(lst.begin(),lst.end());
lock_guard
functor 比如sort中的greater<\void>{}
遇到的错误以及引起的原因
pair p{};// 无法推导类型,不像上面的greater, 没有默认参数
array arr = {1,2,3.14};//推导不出个数
shared_ptr sp(new string);//由于数组指针的退化,这个指针类型区分不出是数组指针还是普通指针,shared_ptr<string> shared_ptr<string []>
上面的例子也引入了,缺少信息和歧义的推导条件会错误,这和函数模板类似
比如字符串,类型很容易推导成char[N] ,如果想要string,就需要写推导指引规则
template <typename A, typename B>
struct Peppermint{
explicit Peppermint(const A&){}
};
Peppermint<int, double> p1{11};
Peppermint p2{22};//err
第二种情况缺少了参数,也没有提示参数,推导不出来
再比如指针
template <typename A, typename B>
struct jazz{
jazz(A*, B*){}
};
int i = 1;
const double d = 3.14;
jazz j1{&i, &d};
jazz j2{&i, nullptr};//err
一个推导规则
template <typename T>
struct MyVec{
template <typename It> MyVec(It,It){}
};
template <typename it> MyVec(It,It) -> MyVec<typename iterator_traits<It>::value_type>;//建立关系
int *ptr = nullptr;
MyVec v(ptr,ptr);
值退化
。
这个数据是在WriteBatch中的,和写WAL相关,数据结构是SavePoint
// When sending a WriteBatch through WriteImpl we might want to
// specify that only the first x records of the batch be written to
// the WAL.
SavePoint wal_term_point_;
struct SavePoint {
size_t size; // size of rep_
int count; // count of elements in rep_
uint32_t content_flags;
SavePoint() : size(0), count(0), content_flags(0) {}
SavePoint(size_t _size, int _count, uint32_t _flags)
: size(_size), count(_count), content_flags(_flags) {}
void clear() {
size = 0;
count = 0;
content_flags = 0;
}
bool is_cleared() const { return (size | count | content_flags) == 0; }
};
具体用法看这个测试用例,在db/fault_injection_test.cc
TEST_P(FaultInjectionTest, WriteBatchWalTerminationTest) {
ReadOptions ro;
Options options = CurrentOptions();
options.env = env_;
WriteOptions wo;
wo.sync = true;
wo.disableWAL = false;
WriteBatch batch;
batch.Put("cats", "dogs");
batch.MarkWalTerminationPoint();
batch.Put("boys", "girls");
ASSERT_OK(db_->Write(wo, &batch));
env_->SetFilesystemActive(false);
NoWriteTestReopenWithFault(kResetDropAndDeleteUnsynced);
ASSERT_OK(OpenDB());
std::string val;
ASSERT_OK(db_->Get(ro, "cats", &val));
ASSERT_EQ("dogs", val);
ASSERT_EQ(db_->Get(ro, "boys", &val), Status::NotFound());
}
能看到wal termination point 的作用,就是在WAL层的一层隔离,这个点之后的kv不写入wal,除非clear,从writebatch append能看出来
Status WriteBatchInternal::Append(WriteBatch* dst, const WriteBatch* src,
const bool wal_only) {
size_t src_len;
int src_count;
uint32_t src_flags;
const SavePoint& batch_end = src->GetWalTerminationPoint();
if (wal_only && !batch_end.is_cleared()) {
src_len = batch_end.size - WriteBatchInternal::kHeader;
src_count = batch_end.count;
src_flags = batch_end.content_flags;
} else {
src_len = src->rep_.size() - WriteBatchInternal::kHeader;
src_count = Count(src);
src_flags = src->content_flags_.load(std::memory_order_relaxed);
}
SetCount(dst, Count(dst) + src_count);
assert(src->rep_.size() >= WriteBatchInternal::kHeader);
dst->rep_.append(src->rep_.data() + WriteBatchInternal::kHeader, src_len);
dst->content_flags_.store(
dst->content_flags_.load(std::memory_order_relaxed) | src_flags,
std::memory_order_relaxed);
return Status::OK();
}
虽然有CreateIfMiss,但有时候目录还会创建失败,场景就是级联目录 rocksdb没有这种语义
在env_posix.cc 里,实现如下
virtual Status CreateDirIfMissing(const std::string& name) override {
Status result;
if (mkdir(name.c_str(), 0755) != 0) {
if (errno != EEXIST) {
result = IOError("While mkdir if missing", name, errno);
} else if (!DirExists(name)) { // Check that name is actually a
// directory.
// Message is taken from mkdir
result = Status::IOError("`"+name+"' exists but is not a directory");
}
}
return result;
};
如果报错 While mkdir if missing dirxx 就是这里了。
当然接口是透明的,rocksdb推荐自己实现env,实现对应的接口就可以了
mkdir(1)命令是有-p指令的(p for parent) 而mkdir(3)函数接口没有这个语义,所以就得循环调用,参考链接1有个粗糙版本
可以看看mkdir(1)的实现,见参考链接2
或者到博客上提issue 我能收到邮件提醒。
背景,给key加了个字段,改写了了WriteBatch, 每组数据会重写,加这个字段。
问题就是mergetest不能过,具体未通过的代码片
{
std::cout << "Test merge in memtable... \n";
size_t max_merge = 5;
auto db = OpenDb(dbname, use_ttl, max_merge);
MergeBasedCounters counters(db, 0);
testCounters(counters, db.get(), compact);
testSuccessiveMerge(counters, max_merge, max_merge * 2);
testSingleBatchSuccessiveMerge(db.get(), 5, 7);
DestroyDB(dbname, Options());
}
其中,testSuccessiveMerge未通过,代码是这样的
void testSuccessiveMerge(Counters& counters, size_t max_num_merges,
size_t num_merges) {
counters.assert_remove("z");
uint64_t sum = 0;
for (size_t i = 1; i <= num_merges; ++i) {
resetNumMergeOperatorCalls();
counters.assert_add("z", i);
sum += i;
if (i % (max_num_merges + 1) == 0) {
assert(num_merge_operator_calls == max_num_merges + 1);
} else {
assert(num_merge_operator_calls == 0);
}
resetNumMergeOperatorCalls();
assert(counters.assert_get("z") == sum);
assert(num_merge_operator_calls == i % (max_num_merges + 1));
}
}
正常情况下,i=6的时候,会触发内部的merge,此时num_merge_operator_calls==6
测试代码逻辑:定义了MergeOperator,实际上assert_add调用是MergeBasedCounters::add, 里面调用了merge
// mapped to a rocksdb Merge operation
virtual bool add(const std::string& key, uint64_t value) override {
char encoded[sizeof(uint64_t)];
EncodeFixed64(encoded, value);
Slice slice(encoded, sizeof(uint64_t));
auto s = db_->Merge(merge_option_, key, slice);
...
}
其实merge底层还是write,但是在内部会判断key是否存在,有seek get动作
我开始一直在在merge_test.cc中加各种打印,猜测是不是数据集的问题,排除,编了个原生的merge_test,然后gdb,
watch num_merge_operator_calls=6
抓到了正常流程下的堆栈
#0 CountMergeOperator::Merge (this=0x7fffe0001320, key=..., existing_value=0x7fffffffc520, value=..., new_value=0x7fffffffc530,
logger=0x7fffe00034b0) at db/merge_test.cc:44
#1 0x000000000060ded4 in rocksdb::AssociativeMergeOperator::FullMergeV2 (this=0x7fffe0001320, merge_in=..., merge_out=0x7fffffffc5b0)
at db/merge_operator.cc:62
#2 0x0000000000608f74 in rocksdb::MergeHelper::TimedFullMerge (merge_operator=0x7fffe0001320, key=..., value=value@entry=0x7fffffffc730,
operands=..., result=0x7fffffffcdb0, logger=0x7fffe00034b0, statistics=0x0, env=0xbb8260 <rocksdb::Env::Default()::default_env>,
result_operand=0x0, update_num_ops_stats=true) at db/merge_helper.cc:81
#3 0x0000000000600877 in rocksdb::SaveValue (arg=0x7fffffffc930, entry=<optimized out>) at db/memtable.cc:709
#4 0x00000000006a369a in rocksdb::(anonymous namespace)::SkipListRep::Get (this=<optimized out>, k=..., callback_args=0x7fffffffc930,
callback_func=0x6000c0 <rocksdb::SaveValue(void*, char const*)>) at memtable/skiplistrep.cc:77
#5 0x00000000005ff6df in rocksdb::MemTable::Get (this=0x7fffe0013a80, key=..., value=0x7fffffffcdb0, s=s@entry=0x7fffffffcd50,
merge_context=merge_context@entry=0x7fffffffca60, range_del_agg=range_del_agg@entry=0x7fffffffcae0, seq=0x7fffffffca50, read_opts=...,
callback=0x0, is_blob_index=0x0) at db/memtable.cc:830
#6 0x000000000057c8fb in Get (is_blob_index=0x0, callback=0x0, read_opts=..., range_del_agg=0x7fffffffcae0, merge_context=0x7fffffffca60,
s=0x7fffffffcd50, value=<optimized out>, key=..., this=<optimized out>) at ./db/memtable.h:203
#7 rocksdb::DBImpl::GetImpl (this=0x7fffe0002510, read_options=..., column_family=<optimized out>, key=..., pinnable_val=0x7fffffffce90,
value_found=0x0, callback=0x0, is_blob_index=0x0) at db/db_impl.cc:1145
#8 0x000000000057d067 in rocksdb::DBImpl::Get (this=<optimized out>, read_options=..., column_family=<optimized out>, key=...,
value=<optimized out>) at db/db_impl.cc:1084
#9 0x00000000006652cd in Get (value=0x7fffffffcdb0, key=..., column_family=0x7fffe000e8b8, options=..., this=0x7fffe0002510)
at ./include/rocksdb/db.h:335
#10 rocksdb::MemTableInserter::MergeCF (this=0x7fffffffd170, column_family_id=0, key=..., value=...) at db/write_batch.cc:1497
#11 0x000000000065e491 in rocksdb::WriteBatch::Iterate (this=0x7fffffffd910, handler=handler@entry=0x7fffffffd170) at db/write_batch.cc:479
#12 0x00000000006623cf in rocksdb::WriteBatchInternal::InsertInto (write_group=..., sequence=sequence@entry=21, memtables=<optimized out>,
flush_scheduler=flush_scheduler@entry=0x7fffe0002e80, ignore_missing_column_families=<optimized out>, recovery_log_number=0,
db=0x7fffe0002510, concurrent_memtable_writes=false, seq_per_batch=false) at db/write_batch.cc:1731
#13 0x00000000005c203c in rocksdb::DBImpl::WriteImpl (this=0x7fffe0002510, write_options=..., my_batch=<optimized out>,
callback=callback@entry=0x0, log_used=log_used@entry=0x0, log_ref=0, disable_memtable=false, seq_used=0x0, batch_cnt=0,
pre_release_callback=0x0) at db/db_impl_write.cc:309
#14 0x00000000005c24c1 in rocksdb::DBImpl::Write (this=<optimized out>, write_options=..., my_batch=<optimized out>) at db/db_impl_write.cc:54
#15 0x00000000005c2972 in rocksdb::DB::Merge (this=this@entry=0x7fffe0002510, opt=..., column_family=column_family@entry=0x7fffe000ebf0,
key=..., value=...) at db/db_impl_write.cc:1501
#16 0x00000000005c2a2f in rocksdb::DBImpl::Merge (this=0x7fffe0002510, o=..., column_family=0x7fffe000ebf0, key=..., val=...)
at db/db_impl_write.cc:33
#17 0x0000000000512ecd in rocksdb::DB::Merge (this=0x7fffe0002510, options=..., key=..., value=...) at ./include/rocksdb/db.h:312
#18 0x00000000005121f8 in MergeBasedCounters::add (this=<optimized out>, key=..., value=<optimized out>) at db/merge_test.cc:236
---Type <return> to continue, or q <return> to quit---
#19 0x000000000050eda0 in assert_add (value=18, key=..., this=0x7fffffffdda0) at db/merge_test.cc:214
#20 (anonymous namespace)::testCounters (counters=..., db=0x7fffe0002510, test_compaction=test_compaction@entry=false) at db/merge_test.cc:287
#21 0x0000000000510119 in (anonymous namespace)::runTest (argc=argc@entry=1, dbname=..., use_ttl=use_ttl@entry=false) at db/merge_test.cc:442
#22 0x000000000040ebc0 in main (argc=1) at db/merge_test.cc:508
最终会调用之前已经添加到db中的merge_operator,merge_test里的merge_operator长这个样子
class CountMergeOperator : public AssociativeMergeOperator {
public:
CountMergeOperator() {
mergeOperator_ = MergeOperators::CreateUInt64AddOperator();
}
virtual bool Merge(const Slice& key,
const Slice* existing_value,
const Slice& value,
std::string* new_value,
Logger* logger) const override {
assert(new_value->empty());
++num_merge_operator_calls;
if (existing_value == nullptr) {
new_value->assign(value.data(), value.size());
return true;
}
...
开始我还给gdb给merge加断点。触发的场景太多,还需要先断点testSuccessMerge,然后在断点merge,单步走也看不清楚,不熟悉流程。
所以只要捋顺清除为什么出问题的版本没走到调用get,调用merge_operator就可以了
开始调试出问题的merge_test,顺着正常流程的堆栈一步一步走,走到insertto都是正常的,走到mergeCF也能证明编码数据是没问题的,下面看为什么没有走Get
memtableinserter::mergeCF长这样 在write_batch.cc中
virtual Status MergeCF(uint32_t column_family_id, const Slice& key,
const Slice& value) override {
assert(!concurrent_memtable_writes_);
// optimize for non-recovery mode
...
Status ret_status;
MemTable* mem = cf_mems_->GetMemTable();
auto* moptions = mem->GetImmutableMemTableOptions();
bool perform_merge = false;
// If we pass DB through and options.max_successive_merges is hit
// during recovery, Get() will be issued which will try to acquire
// DB mutex and cause deadlock, as DB mutex is already held.
// So we disable merge in recovery
if (moptions->max_successive_merges > 0 && db_ != nullptr &&
recovering_log_number_ == 0) {
LookupKey lkey(key, sequence_);
// Count the number of successive merges at the head
// of the key in the memtable
size_t num_merges = mem->CountSuccessiveMergeEntries(lkey);
if (num_merges >= moptions->max_successive_merges) {
perform_merge = true;
}
}
if (perform_merge) {
// 1) Get the existing value
std::string get_value;
// Pass in the sequence number so that we also include previous merge
// operations in the same batch.
SnapshotImpl read_from_snapshot;
read_from_snapshot.number_ = sequence_;
ReadOptions read_options;
read_options.snapshot = &read_from_snapshot;
auto cf_handle = cf_mems_->GetColumnFamilyHandle();
if (cf_handle == nullptr) {
cf_handle = db_->DefaultColumnFamily();
}
db_->Get(read_options, cf_handle, key, &get_value);
Slice get_value_slice = Slice(get_value);
// 2) Apply this merge
auto merge_operator = moptions->merge_operator;
assert(merge_operator);
std::string new_value;
Status merge_status = MergeHelper::TimedFullMerge(
merge_operator, key, &get_value_slice, {value}, &new_value,
moptions->info_log, moptions->statistics, Env::Default());
if (!merge_status.ok()) {
// Failed to merge!
// Store the delta in memtable
perform_merge = false;
} else {
// 3) Add value to memtable
bool mem_res = mem->Add(sequence_, kTypeValue, key, new_value);
if (UNLIKELY(!mem_res)) {
assert(seq_per_batch_);
ret_status = Status::TryAgain("key+seq exists");
const bool BATCH_BOUNDRY = true;
MaybeAdvanceSeq(BATCH_BOUNDRY);
}
}
}
if (!perform_merge) {
// Add merge operator to memtable
bool mem_res = mem->Add(sequence_, kTypeMerge, key, value);
if (UNLIKELY(!mem_res)) {
assert(seq_per_batch_);
ret_status = Status::TryAgain("key+seq exists");
const bool BATCH_BOUNDRY = true;
MaybeAdvanceSeq(BATCH_BOUNDRY);
}
}
...
}
上面的不相关代码省略了,出问题的merge_test没走get,直接走的add,也就没有merge,这两个分支的关键点就是perform_merge的值,也就是mem->CountSuccessiveMergeEntries
的值, 加了断点打印了一下,结果是0,所以问题进一步缩小,这个函数在memtable.cc 中,长这个样子
size_t MemTable::CountSuccessiveMergeEntries(const LookupKey& key) {
Slice memkey = key.memtable_key();
// A total ordered iterator is costly for some memtablerep (prefix aware
// reps). By passing in the user key, we allow efficient iterator creation.
// The iterator only needs to be ordered within the same user key.
std::unique_ptr<MemTableRep::Iterator> iter(
table_->GetDynamicPrefixIterator());
iter->Seek(key.internal_key(), memkey.data());
size_t num_successive_merges = 0;
for (; iter->Valid(); iter->Next()) {
const char* entry = iter->key();
uint32_t key_length = 0;
const char* iter_key_ptr = GetVarint32Ptr(entry, entry + 5, &key_length);
if (!comparator_.comparator.user_comparator()->Equal(
UserKeyFromRawInternalKey(iter_key_ptr, key_length),
key.user_key())) {
break;
}
const uint64_t tag = DecodeFixed64(iter_key_ptr + key_length - 8);
ValueType type;
uint64_t unused;
UnPackSequenceAndType(tag, &unused, &type);
if (type != kTypeMerge) {
break;
}
++num_successive_merges;
}
return num_successive_merges;
}
我加了断点,根本没有进循环,也就是说 iter->Valid()=false 到这里,已经很清晰了,就是SeekKey的问题,之前添加的字段这个Prefixiterator可能处理不了,需要预处理一下
这里又涉及到了一个非常恶心的问题,userkey internal key memkey区别到底在哪里
本身一个key Slice,会被Lookupkey重新编码一下,编码内部的memkey就是原来的key。internalkey是带上sequence number的memkey
理清这些概念,注意到背景,修改lookupkey初始化。因为进入mergeCf之前已经编码了要加的字段,lookupkey有加了一次,需要预处理一下。结束。
# 删除断点
delete 5
# 单步调试想返回,需要提前record
record
reverse-next
record stop
或者到博客上提issue 我能收到邮件提醒。
补课
数据库并发控制(Concurrency Control)实现,锁和时间序
基于锁,也就是 Two Phrase Locking,2PL
2PL
缺陷,业务依赖性死锁,无法避免。
基于时间戳,可以实现乐观并发控制(OCC,Optimistic Concurrency Control)和MVCC
时间序,默认事务不冲突,检查时间超前,事务失败。
而MVCC有多种实现,通常都是多快照+时间戳维护可见性,两种实现
主要操作
快照保证读写不阻塞,为了串行化还是要限制读写顺序
隔离程度以及影响
影响 :脏读 不可重复读 幻读 更新丢失
隔离程度
串行化 | 可重复读RR | 提交读RC | 未提交度RU |
---|---|---|---|
幻读 | 不可重复读,幻读 | 脏读,不可重复读,幻读 |
快照隔离(SI) 串行化
Snapshot Isolation 在 Snapshot Isolation 下,不会出现脏读、不可重复度和幻读三种读异常。并且读操作不会被阻塞,对于读多写少的应用 Snapshot Isolation 是非常好的选择。并且,在很多应用场景下,Snapshot Isolation 下的并发事务并不会导致数据异常。所以,主流数据库都实现了 Snapshot Isolation,比如 Oracle、SQL Server、PostgreSQL、TiDB、CockroachDB
虽然大部分应用场景下,Snapshot Isolation 可以很好地运行,但是 Snapshot Isolation 依然没有达到可串行化的隔离级别,因为它会出现写偏序(write skew)。Write skew 本质上是并发事务之间出现了读写冲突(读写冲突不一定会导致 write skew,但是发生 write skew 时肯定有读写冲突),但是 Snapshot Isolation 在事务提交时只检查了写写冲突。
为了避免 write skew,应用程序必须根据具体的情况去做适配,比如使用SELECT … FOR UPDATE,或者在应用层引入写写冲突。这样做相当于把数据库事务的一份工作扔给了应用层。 Serializable Snapshot Isolation 后来,又有人提出了基于 Snapshot Isolation 的可串行化 —— Serializable Snapshot Isolation,简称 SSI(PostgreSQL 和 CockroachDB 已经支持 SSI)。 为了分析 Snapshot Isolation 下的事务调度可串行化问题,有论文提出了一种叫做 Dependency Serialization Graph (DSG) 的方法(可以参考下面提到的论文,没有深究原始出处)。通过分析事务之间的 rw、wr、ww 依赖关系,可以形成一个有向图。如果图中无环,说明这种情况下的事务调度顺序是可串行化的。这个算法理论上很完美,但是有一个很致命的缺点,就是复杂度比较高,难以用于工业生产环境。
Weak Consistency: A Generalized Theory and Optimistic Implementations for Distributed Transactions 证明在 Snapshot Isolation 下, DSG 形成的环肯定有两条 rw-dependency 的边。 Making snapshot isolation serializable 再进一步证明,这两条 rw-dependency 的边是“连续”的(一进一出)。 后来,Serializable Isolation for snapshot database 在 Berkeley DB 的 Snapshot Isolation 之上,增加对事务 rw-dependency 的检测,当发现有两条“连续”的 rw-dependency 时,终止其中一个事务,以此避免出现不可串行化的可能。但是这个算法会有误判——不可以串行化的事务调用会出现两条“连续”的 rw-dependency 的边,但是出现两条“连续”的 rw-dependency 不一定会导致不可串行化。
Serializable Snapshot Isolation in PostgreSQL 描述了上述算法在 PostgreSQL 中的实现。 上面提到的 Berkeley DB 和 PostgreSQL 的 SSI 实现都是单机的存储。A Critique of Snapshot Isolation 描述了如何在分布式存储系统上实现 SSI,基本思想就是通过一个中心化的控制节点,对所有 rw-dependency 进行检查,有兴趣的可以参考论文。
读写冲突,写写冲突,写偏序,黑白球,串行化,以及SSI
参考链接19
occ silo见参考链接12,有很多细节,epoch,memory fence,masstree,occ等
或者到博客上提issue 我能收到邮件提醒。
演讲主题 是fancy pointer 作者称之为synthetic pointer
或者到博客上提issue 我能收到邮件提醒。