(译)dd, bs= and why you should use conv=fsync

整理自这篇文章 https://abbbi.github.io/dd/

简单总结

If one uses dd with a bigger block size (>= 4096), be sure to use either the oflag=direct or conv=fsync option to have proper error reporting while writing data to a device. I would prefer conv=fsync, dd will then fsync() the file handle once and report the error, without having the performance impact which oflag=direct has.

用dd的时候尽可能用conv=fsync提前发现system error

作者用dd来做测试,测试盘有坏块的场景

预备工作

 truncate -s 1G /tmp/baddisk
 losetup /dev/loop2 /tmp/baddisk
 dmsetup create baddisk << EOF 
    0 6050 linear /dev/loop2 0
    6050 155 error
    6205 2090947 linear /dev/loop2 6205 
 EOF

可以看到设置之后的盘的属性

fdisk -l

磁盘 /dev/loop2:1073 MB, 1073741824 字节,2097152 个扇区
Units = 扇区 of 1 * 512 = 512 bytes
扇区大小(逻辑/物理):512 字节 / 512 字节
I/O 大小(最小/最佳):512 字节 / 512 字节

可以看到每个扇区是0.5KB

写到错误的位置,也就是6050,需要3M(6050*0.5k)所以,我们调用dd写入4M,肯定就写到错误的地方,就会有报错

但是实际上没有任何报错 算一下 4096*1000就是4M

dd if=/dev/zero of=/dev/mapper/baddisk bs=4096 count=1000
  4096000 bytes (4.1 MB, 3.9 MiB) copied, 0.0107267 s, 382 MB/s

如果不指定bs就会报错,一直写

dd if=/dev/zero of=/dev/mapper/baddisk
 dd: writing to '/dev/mapper/baddisk': Input/output error
 3096576 bytes (3.1 MB, 3.0 MiB) copied, 0.0238947 s, 130 MB/s

抓dmesg的信息,也是有报错的

dmesg
[8807366.717526] Buffer I/O error on device dm-0, logical block 766
[8807366.718560] lost page write due to I/O error on dm-0

为什么dd命令不报错?

strace抓信息

我这里抓的是这样的

open("/dev/mapper/baddisk", O_WRONLY|O_CREAT|O_TRUNC, 0666) = 3
dup2(3, 1)                              = 1
close(3)  = 0
read(0, "\0\0\0\0\0\0\0\0\0\0\0\0\0\0\0\0\0\0\0\0\0\0\0\0\0\0\0\0\0\0\0\0"..., 4096) = 4096
write(1, "\0\0\0\0\0\0\0\0\0\0\0\0\0\0\0\0\0\0\0\0\0\0\0\0\0\0\0\0\0\0\0\0"..., 4096) = 4096
read(0, "\0\0\0\0\0\0\0\0\0\0\0\0\0\0\0\0\0\0\0\0\0\0\0\0\0\0\0\0\0\0\0\0"..., 4096) = 4096

可见打开文件读写都没遇到报错,如果强制加上O_DIRECT O_SYNC之类的符号,就会报错了

背后的细节问题: Linux内核buffered IO影响,有buffered IO,写入不是立即的

而且,对于buffered IO遇到的硬件异常,api是不能立刻感知到的,只有写回的时候才会感知到,所以才有这个问题
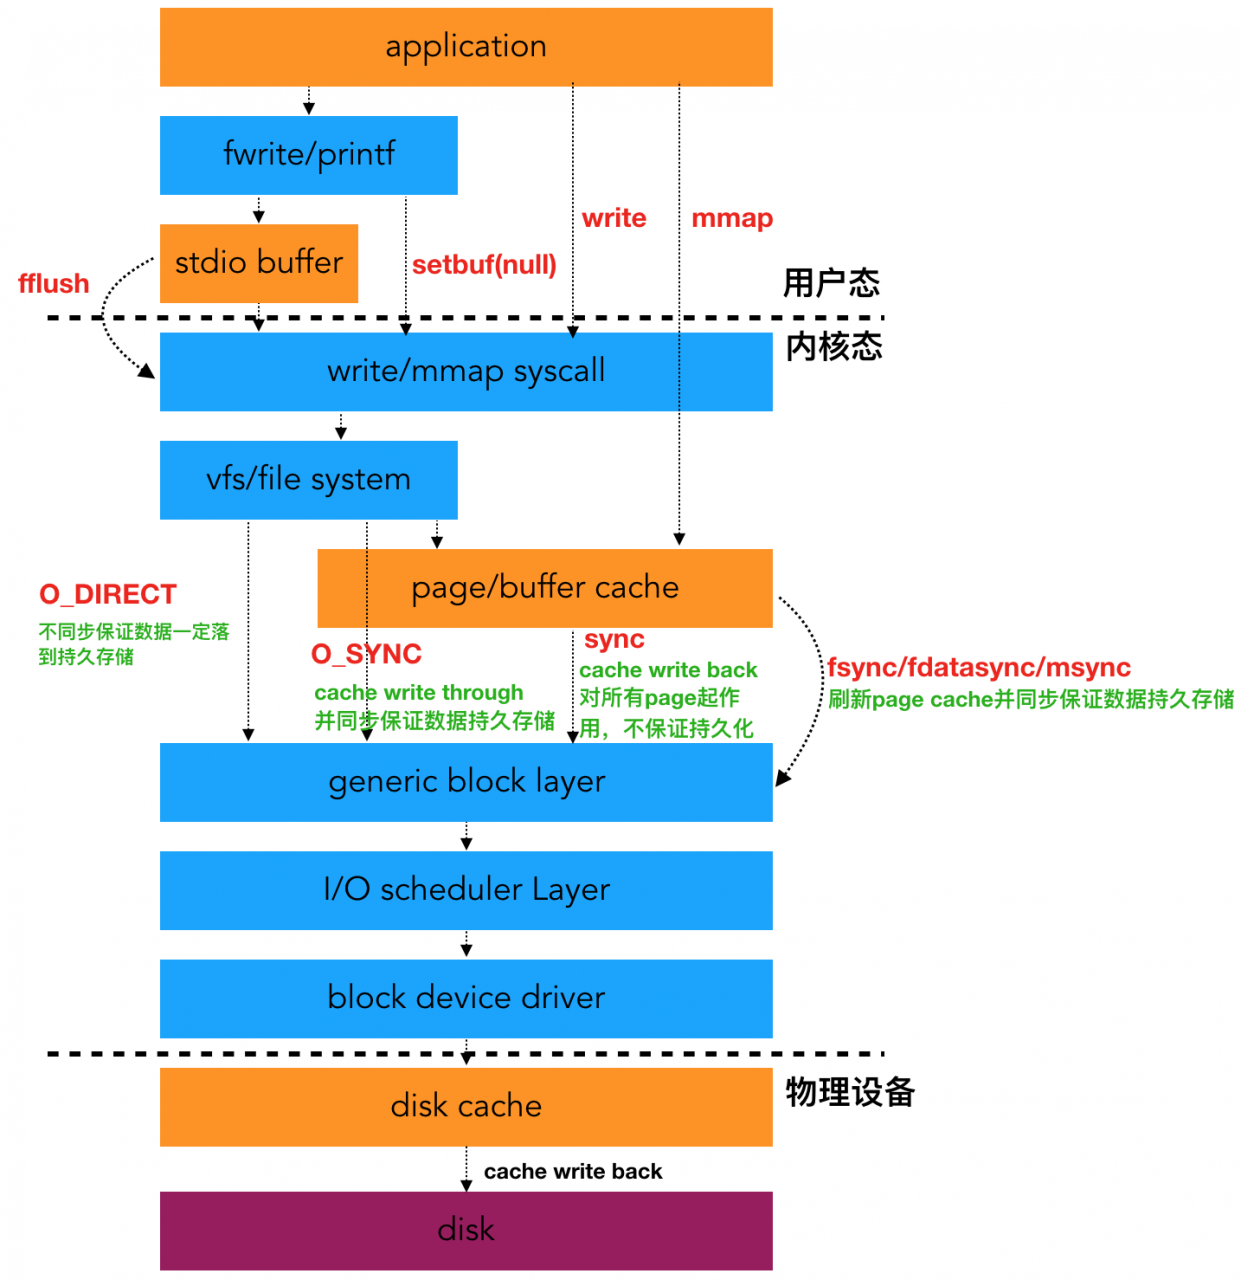
指定两个FLAG中的一个就解决了这个问题 ,oflag=direct慢一鞋,相当于O_SYNC O_DIRECT组合,conv=fsync更好一些

buffered-io原理

当然面对这个问题,即buffered IO写入遇到硬件层异常,在写回时才出错,如何提前感知错误,也有很多讨论

比如这个SO问题

答主Craig Ringer 也是pg开发人员,遇到了这个问题,解决方案就是用fsync要检查错误

引述一下他的回答:如果以为用fsync(循环调用fsync直到成功)就万事大吉,那就错了

换句话说如果fsync遇到错误,那就是硬件有问题,应该abort退出

which is then detected by wait_on_page_writeback_range(...) as called by do_sync_mapping_range(...) as called by sys_sync_file_range(...) as called by sys_sync_file_range2(...) to implement the C library call fsync().

But only once!

This comment on sys_sync_file_range

168  * SYNC_FILE_RANGE_WAIT_BEFORE and SYNC_FILE_RANGE_WAIT_AFTER will detect any
169  * I/O errors or ENOSPC conditions and will return those to the caller, after
170  * clearing the EIO and ENOSPC flags in the address_space.

suggests that when fsync() returns -EIO or (undocumented in the manpage) -ENOSPC, it will clear the error state so a subsequent fsync() will report success even though the pages never got written.

Sure enough wait_on_page_writeback_range(...) clears the error bits when it tests them:

301         /* Check for outstanding write errors */
302         if (test_and_clear_bit(AS_ENOSPC, &mapping->flags))
303                 ret = -ENOSPC;
304         if (test_and_clear_bit(AS_EIO, &mapping->flags))
305                 ret = -EIO;

So if the application expects it can re-try fsync() until it succeeds and trust that the data is on-disk, it is terribly wrong.

另外在4.9之后的新内核,直接返回EIO,综上,要判定fsync返回EIO

作者的验证代码在这 https://github.com/ringerc/scrapcode/blob/fd71dffea787847d303e22db95e8b6ca23d06a6d/testcases/fsync-error-clear/standalone/fsync-error-clear.c

作者在PG的讨论串在这里https://www.postgresql.org/message-id/flat/CAMsr%2BYE5Gs9iPqw2mQ6OHt1aC5Qk5EuBFCyG%2BvzHun1EqMxyQg%40mail.gmail.com#CAMsr+YE5Gs9iPqw2mQ6OHt1aC5Qk5EuBFCyG+vzHun1EqMxyQg@mail.gmail.com

另外LWN有两个帖子

https://lwn.net/Articles/724307/

https://lwn.net/Articles/752063/

也介绍了关于这个问题相关的内核应该做的改动,更好的IO错误处理,此处不提


ref

  • https://hustcat.github.io/blkcg-buffered-io/ 博客也不错,好像没做seo
Read More

c++参数传值以及move

https://xania.org/202101/cpp-by-value-args

就是使用move需要注意的地方,取决于原来的值到底能不能move,move就是偷,掏空

作者贴了一个对比 https://godbolt.org/z/G4hYrT

注意到一个调用了一次 std::string::_M_create 另一个调用了两次,

这两种accessor 一种是传值 move,一种是传const引用 (不是常量引用是编不过的)

//调用一次_M_create
#include <string>

struct Thing {
  std::string s_;
  void set_s(std::string s) { s_ = std::move(s); }
};

void test(Thing &t) {
  t.set_s("this is a long string to show something off");
}
//调用两次_M_create
#include <string>

struct Thing {
  std::string s_;
  void set_s(const std::string &s) { s_ = s; //s_ = std::move(s); }
};

void test(Thing &t) {
  t.set_s("this is a long string to show something off");
}

为什么结果不同?主要原因是常量引用初始化之后,根本无法调用move,于是又拷贝构造一遍,所以调用两次create

而第一种写法,只一次构造。这也是现在推荐的accessor的写法

PS: 另外,测试代码的string要足够长 > 24,不然会有SBO优化,不会调用M_create

不过小串的版本,move也是要比传常量引用要省的 看这个对比 https://godbolt.org/z/xr1bno

PPS: 如果参数是unique_ptr

#include <string>
#include <memory>
struct Thing {
  std::unique_ptr<std::string> s_;
  void set_s(std::unique_ptr<std::string> s) { s_ = std::move(s); }
};

void test(Thing &t) {
  auto s = std::make_unique<std::string>("this is a long string to show something off")
  //t.set_s(s);
  t.set_s(std::move(s));
}

传参数不能发生构造,必须强制move,不move直接编译不过,也不能直接传右值

PPPS:

如果是循环中调用setter,可能分配会更多

std::string s;
Thing t;
for (int i = 0 ; i < 900 ; ++i) {
  set_next_string(s, i);
  t.set_s(s);
}

不过作为setter/accessor,不像是正常人的用法,这种场景下,s_是最开始有分配,后面有足够的空间,能省一些malloc,但是传右值+move绝对会多次malloc

如果能保证s的声明周期,并不是非得落在Thing中,那么用std::string_view会更好。

没有绝对正确的方案,取决于你怎么用


Read More

用python做个小调试器

翻译整理自这几片文章 链接1

作者自制了个语言 设计到底层原语的调试,需要调试器,他用 python-ptrace library, pyelftoolsdistorm3 糊了一个

下面是介绍

先安装

pip3 install python-ptrace

然后执行下面的python语句,注意: a.out 随便写个c程序,生成可执行文件,这个程序不能直接退出,否则会出现错误

ptrace.error.PtraceError: ptrace(cmd=16, pid=30165, 0, 0) error #1: Operation not permitted

这个错误会误导你以为什么系统错误,实际上不是的,进程pid不在strace肯定错误的

作者的代码是这样的

#include <stdio.h>
#include <unistd.h>

int my_var;
typedef int (*func_ptr_t)(void);

void test_function(){
  printf("Called test_function! Probably from the debugger.\n");
  printf("my_var=%i\n", my_var);
}

int main(){
  printf("Starting main loop\n");
  my_var = 1;
  while (1){
    usleep(100000);
  }
}

python脚本准备

import ptrace.debugger
import subprocess
shell_command = ["./a.out"]
child_proc = subprocess.Popen(shell_command)
pid = child_proc.pid
debugger = ptrace.debugger.PtraceDebugger()
process = debugger.addProcess(pid, False)

这样就有了一个简单的调试环境,和操作gdb是一样的,不过更清晰一些

获取寄存器

regs = process.getregs()
registers = {k:getattr(regs, k) for k in dir(regs) if not k.startswith('_')}
registers
{'cs': 51, 'ds': 0, 'eflags': 582, 'es': 0, 'fs': 0, 'fs_base': 139788087355200, 'gs': 0, 'gs_base': 0, 'orig_rax': 35, 'r10': 140721172406752, 'r11': 582, 'r12': 4195536, 'r13': 140721172408432, 'r14': 0, 'r15': 0, 'r8': 18446744073709551615, 'r9': 0, 'rax': 18446744073709551100, 'rbp': 140721172408208, 'rbx': 0, 'rcx': 18446744073709551615, 'rdi': 140721172408176, 'rdx': 0, 'rip': 139788083114400, 'rsi': 0, 'rsp': 140721172408168, 'ss': 43}

读内存

import binascii
binascii.hexlify(process.readBytes(registers['rsp'], 8))
b'd4be0cf3227f0000'

单步执行汇编

process.getreg('rip')  #139788083114406
process.singleStep()
process.getreg('rip') #139788083114408

触发信号

import signal
process.waitSignals(signal.SIGTRAP)

这里是埋信号,后面主动写寄存器出发

也可以把这两步结合起来

def step():
    process.singleStep()
    process.waitSignals(signal.SIGTRAP)

Int 3触发,对应0xCC

直接写入

process.writeBytes(process.getreg('rip'), bytes(0xCC))
process.cont()
process.waitSignals(signal.SIGTRAP)

ref

  • 作者的演示代码仓库 https://github.com/asrp/ptracedbg/blob/master/
  • strace遇到错误的解决方案 https://blog.packagecloud.io/eng/2015/11/15/strace-cheat-sheet/

Read More

实现一个benchmark cli应该考虑点啥

benchmark的典型架子,网络端

  • 多线程worker,worker死循环干活
  • 统计信息,统计p99统计
  • 后台线程实时打印qps/打印进度条
  • 参数读取
  • 日志打印设计,日志要方便解析,最好支持open traceing那种,这样不用人来看了
    • 还可以设计unique id,这样来区分不同的bench
  • 数据打印更直观一些histogram

一个典型的例子是memtier-benchmark,多线程worker,worker内部潜入libevent填数据,这个架构

cli典型架子

  • repl 循环

  • 补全

  • 参数读取

典型例子redis-cli

Arangodb 的cli/bench就设计的很有意思,值得解读并把他的代码抽出来抽成公共库


ref

  • https://clig.dev/

Read More

实现类型为key的map

翻译整理自这篇文章,加了点自己的理解

类型为key,value不重要,以string举例

其实主要就是解决类型的映射,如何把类型映射成什么东西,肯定离不开模版就是了

静态map

先说一种static compile time map的方法,也就是模版偏特化

形状可以是这样的

template<typename K, typename V>
struct TypeMap { static const V v;}

然后根据不同的K来偏特化

这里弱化一下,用string举例,去掉V

#include <iostream>
#include <string>
template <typename T>
struct StringAnnotationTypeMap { static const std::string annotation; };
//故意不实现,这样没注册的类型会直接link error
//template <typename T>                         
//const std::string StringAnnotationTypeMap<T>::annotation = "default";

#define _TYPE_REGISTER(T, s)                            \
template <>                                                   \
const std::string StringAnnotationTypeMap<T>::annotation = (s);\
template <>                                                   \
const std::string StringAnnotationTypeMap<T&>::annotation = (s)
//这个T&是为了方便从指针推导出类型的特化

#define __STR(x) #x
#define _STR(x) __STR(x)
// 这个宏的目的是拼不同的类型
// 在rpc场景下,rpc函数名, rpc的request response参数都有相同的前缀
// 通过宏帮忙拼接出 参数 < - > rpc函数名字的映射
#define REQ(F) _TYPE_REGISTER(F##Request, _STR(F))
#define RSP(F) _TYPE_REGISTER(F##Response, _STR(F))

struct ARequest{};
struct BResponse{};
REQ(A);
RSP(B);

int p(const std::string & a) {
    std::cout<<a<<'\n';
    return 0;
}

int main() {
  p(StringAnnotationTypeMap<ARequest>::annotation);
  p(StringAnnotationTypeMap<BResponse>::annotation);
  BResponse *p;
  p(StringAnnotationTypeMap<decltype(*p)>::annotation);
}

这个方案用用还行,缺点是必须在编译期间就定好。

如果想要runtime方案,如何设计?

运行时typemap

考虑ECS设计模式 可以看这个链接简单了解,不是本文的重点

大概意思就是尽可能的组件化,每个组件有各自的侵入方法,更灵活的组装实现

而不是去操作一个大的数据结构,对数据结构提供N个接口

每个Entity对应一个实例,每个组件是Component

不想让Entity和具体的Component绑定,那就需要一个字符串 <->类型的typemap来辅助,运行时注册

下面举例

class Entity {
public:
// ...
  AbstractComponent* get (const std::string &component_name) {
    auto it = m_components.find(component_name);
    assert(it != m_components.end());
    return it->second.get();
  }

private:
  std::unordered_map<std::string, std::unique_ptr<AbstractComponent>> m_components;
//...
};

至于component,继承基类就可以

class HitPointComponent : public AbstractComponent {
public:
  void takeHitFrom(const Entity *other_entity);
  void add(int hp);
  void setCurrentCap(int c);
  
private:
  int m_hitPoints;  // amount of hitpoints, can't be greater than m_currentCap
  int m_currentCap; // maximum amount of hitpoints
};

调用就这个德行

dynamic_cast<HitPointComponent>(player->get("HitPointComponent"))->takeHitFrom(projectile)

就是看着闹心,犯个错实在太轻松,core给你看

我们需要type map,而不是type-string map

既然有类型type,提供类型模版接口,帮助指针转换, 类似这种用法

auto e = std::make_unique<Entity>();
e->provideComponent<HitPointComponent>(std::make_unique<HitPointComponent>());
//...
e->get<HitPointComponent>()->takeHitFrom(projectile);

增加与调用接口需要指定参数类型,也就是说子类的信息没丢,那么,基类实际上不需要放接口,只需要定义虚析构函数就行了

如何实现typemap 之保存类型信息

首先考虑的就是type_info 返回整数

这里要考虑两个问题,1 是type_info的实现是依赖RTTI的,2是type_info是内部调用hash_code,这个实现是不透明的,换言之,这个返回值是不是唯一的,不能保证,只能确定同一个类型肯定返回同一个值

解决方案,自己引入一个getTypeId 保证每个类型的值唯一,一个很简单的唯一方法,自增id

// In a header file:
#include <atomic>

extern std::atomic_int TypeIdCounter;

template <typename T>
int getTypeId() {
  static int id = ++TypeIdCounter;
  return id;
}

// In a *.cpp file:
std::atomic_int TypeIdCounter(0);

当然,如果是单线程,可以用int代替atomic_int

这样,调用一次,就会特化一次,而且每个类型的id是不同的,在不同的翻译单元(TU)里,这就保证了id唯一

有唯一id之后,再保存一个id < - > value 就可以了,当然value是模版,随便是什么都可以

#include <unordered_map>
#include <atomic>

template <class ValueType>
class TypeMap {
  // Internally, we'll use a hash table to store mapping from type
  // IDs to the values.
  typedef std::unordered_map<int, ValueType> InternalMap;
public:
  typedef typename InternalMap::iterator iterator;
  typedef typename InternalMap::const_iterator const_iterator;
  typedef typename InternalMap::value_type value_type;

  const_iterator begin() const { return m_map.begin(); }
  const_iterator end() const { return m_map.end();  }
  iterator begin() { return m_map.begin();  }
  iterator end() { return m_map.end(); }

  // Finds the value associated with the type "Key" in the type map.
  template <class Key>
  iterator find() { return m_map.find(getTypeId<Key>());  }

  // Same as above, const version
  template <class Key>
  const_iterator find() const { return m_map.find(getTypeId<Key>()); }

  // Associates a value with the type "Key"
  template <class Key>
  void put(ValueType &&value) {
    m_map[getTypeId<Key>()] = std::forward<ValueType>(value);
  }  

private:
  template <class Key>
  inline static int getTypeId() {
    static const int id = LastTypeId++;
    return id;
  }

  static std::atomic_int LastTypeId;
  InternalMap m_map;
};

template <class ValueType>
std::atomic_int TypeMap<ValueType>::LastTypeId(0);

这样用起来就是这样的

TypeMap<std::string> tmap;
tmap.put<int>("integers!");
tmap.put<double>("doubles!");
std::cout << tmap.find<int>()->second << "\n";

最终回到ECS模型上来,把Component做Value,问题就解决了

class Entity {
public:
// ...
  template <typename Component>
  Component* get() {
    auto it = m_components.find<Component>();
    assert(it != m_components.end());
    return static_cast<Component*>(it->second.get());
  }
  
  template <typename Component>
  void provideComponent(std::unique_ptr<Component> &&c) {
    m_components.put<Component>(std::forward<std::unique_ptr<Component>>(c));
  }

private:
  TypeMap<std::unique_ptr<AbstractComponent>> m_components;
//...
};

老知识,新复习


update 2021-01-10-20-14

其实这种模式,如果是全局的组件,用type_id就够用了,以arangodb为例子,全局server有个addFeature和getFeature接口,思路和上面基本一致,这里把代码贴出来

其中_features就是type map

class ApplicationServer {
  using FeatureMap =
      std::unordered_map<std::type_index, std::unique_ptr<ApplicationFeature>>;
  ApplicationServer(ApplicationServer const&) = delete;
  ApplicationServer& operator=(ApplicationServer const&) = delete;
////省略一部分代码
 public:
   // adds a feature to the application server. the application server
   // will take ownership of the feature object and destroy it in its
   // destructor
   template <typename Type, typename As = Type, typename... Args,
             typename std::enable_if<std::is_base_of<ApplicationFeature, Type>::value, int>::type = 0,
             typename std::enable_if<std::is_base_of<ApplicationFeature, As>::value, int>::type = 0,
             typename std::enable_if<std::is_base_of<As, Type>::value, int>::type = 0>
   As& addFeature(Args&&... args) {
     TRI_ASSERT(!hasFeature<As>());
     std::pair<FeatureMap::iterator, bool> result =
         _features.try_emplace(std::type_index(typeid(As)),
                           std::make_unique<Type>(*this, std::forward<Args>(args)...));
     TRI_ASSERT(result.second);
     result.first->second->setRegistration(std::type_index(typeid(As)));
#ifdef ARANGODB_ENABLE_MAINTAINER_MODE
     auto obj = dynamic_cast<As*>(result.first->second.get());
     TRI_ASSERT(obj != nullptr);
     return *obj;
#else
     return *static_cast<As*>(result.first->second.get());
#endif
   }

   // checks for the existence of a feature by type. will not throw when used
   // for a non-existing feature
   bool hasFeature(std::type_index type) const noexcept {
     return (_features.find(type) != _features.end());
   }

   // checks for the existence of a feature. will not throw when used for
   // a non-existing feature
   template <typename Type, typename std::enable_if<std::is_base_of<ApplicationFeature, Type>::value, int>::type = 0>
   bool hasFeature() const noexcept {
     return hasFeature(std::type_index(typeid(Type)));
   }

   // returns a reference to a feature given the type. will throw when used for
   // a non-existing feature
   template <typename AsType, typename std::enable_if<std::is_base_of<ApplicationFeature, AsType>::value, int>::type = 0>
   AsType& getFeature(std::type_index type) const {
     auto it = _features.find(type);
     if (it == _features.end()) {
       throwFeatureNotFoundException(type.name());
     }
#ifdef ARANGODB_ENABLE_MAINTAINER_MODE
     auto obj = dynamic_cast<AsType*>(it->second.get());
     TRI_ASSERT(obj != nullptr);
     return *obj;
#else
     return *static_cast<AsType*>(it->second.get());
#endif
   }

   // returns a const reference to a feature. will throw when used for
   // a non-existing feature
   template <typename Type, typename AsType = Type,
             typename std::enable_if<std::is_base_of<ApplicationFeature, Type>::value, int>::type = 0,
             typename std::enable_if<std::is_base_of<Type, AsType>::value || std::is_base_of<AsType, Type>::value, int>::type = 0>
   AsType& getFeature() const {
     auto it = _features.find(std::type_index(typeid(Type)));
     if (it == _features.end()) {
       throwFeatureNotFoundException(typeid(Type).name());
     }
#ifdef ARANGODB_ENABLE_MAINTAINER_MODE
     auto obj = dynamic_cast<AsType*>(it->second.get());
     TRI_ASSERT(obj != nullptr);
     return *obj;
#else
     return *static_cast<AsType*>(it->second.get());
#endif
   }

   // map of feature names to features
   FeatureMap _features;
}

其实可以把type_index和type_info隐藏的更深一些,不提供type_index的接口,这样背后替换更轻松一些

使用时这样的

    ApplicationServer server(options, SBIN_DIRECTORY);
//...
    // Adding the Phases
    server.addFeature<AgencyFeaturePhase>();
    server.addFeature<CommunicationFeaturePhase>();
    server.addFeature<AqlFeaturePhase>();
    server.addFeature<BasicFeaturePhaseServer>();
    server.addFeature<ClusterFeaturePhase>();
//...

效果类似


ref

  • https://gpp.tkchu.me/ 意外找到了游戏编程模式的中文翻译
  • Arangodb 源码 https://github.com/arangodb/arangodb

Read More

12月待读

http://ot-note.logdown.com/posts/231212/compile-time-constant-comparison-take-the-character-the-length-of-the-string-test

介绍crow里的编译期比较字符串。crow star了,一直没机会看

保存type类型的库 https://github.com/Neargye/nameof

字节跳动的rocksdb开源了

https://github.com/bytedance/terarkdb

https://www.tuicool.com/wx/BFRRb2y

他们也实现了kv分离,复习一下kv分离

https://en.pingcap.com/blog/titan-storage-engine-design-and-implementation

字节小伙的sig_tree

https://github.com/JimChengLin/sig_tree/

我数据结构的基础还是差

腾讯的tendis开源了

https://github.com/Tencent/Tendis

没有exporter 其实可以照着https://github.com/oliver006/redis_exporter 改,我发现他们这个还不支持集群模式,所以一时半会还改不了

boost hana的中文翻译,其实一直没机会用,也就没看

有机会调查一下

https://github.com/freezestudio/hana.zh/blob/master/hana-zh.md

https://plywood.arc80.com/

有反射

React 教程 https://zh-hans.reactjs.org/tutorial/tutorial.html

lisp方言

https://github.com/SuperFola/Hitoban

https://github.com/ArkScript-lang/Ark

一个小脚本语言,架构类似lua

https://github.com/Skiars/berry

这种脚本语言和mruby相比有啥优势?哦嵌入式

https://github.com/ssloy/tinyraycaster

https://github.com/ssloy/tinyraytracer

简短的教程,教你写光锥

rust中文教程

https://kaisery.github.io/trpl-zh-cn

了解lua

https://github.com/lichuang/Lua-Source-Internal/blob/master/doc/ch02-Lua%E4%B8%AD%E7%9A%84%E6%95%B0%E6%8D%AE%E7%B1%BB%E5%9E%8B.md

https://www.zhihu.com/question/20617406

分形树

http://mysql.taobao.org/monthly/2016/04/09/

https://github.com/percona/PerconaFT

https://github.com/percona/tokudb-engine

http://www.fxysw.com/thread-5061-1-1.html

http://mysql.taobao.org/monthly/2016/03/01/

toydb

https://github.com/erikgrinaker/toydb


Read More

(译)Data Structures and Algorithms for Big Databases


这篇文章是percona的在xldb2012的分享,是一篇教程,介绍了一些基本概念,比较旧了,了解概念

官方总结 ppt链接

  • 如何选取数据结构能显著减轻(signaficantly mitigate)插入/查询/更新 的开销
  • 这些数据结构数据量大了,怎样更高效的利用内存

大数据,也就是放不下内存,靠数据结构来管理,教程也是针对大数据场景下数据结构的管理来展开的

Module 1: I/O model and cache-oblivious analysis.

IO带宽,三个参数, 数据大小N,内存大小M,传块大小B

  • 如果有1000M数据,10M内存,数据块1M,怎么排序呢
    • 首先读10M 排一次,一共排100次
    • 然后10个10M合并,一共10次
    • 然后10个100M合并
  • 浪费的IO
    • 首先是N/B次 传输,然后是合并logM/B(N/B)

上面这个也叫做DAM(Disk-Access-Model)分析,因为这种场景下,内存不是瓶颈,IO是瓶颈

问题在于,对于cache-oblivious的场景,你是不知道M(可用内存) B(传输块大小)的,作者做了一版穷举B的测试,数据表示没有最佳的B

感觉作者没说完啊,对于CO怎么优化也没说

Module 2: Write-optimized data structures. We give the optimal trade-off between inserts and point queries. We show how to build data structures that lie on this tradeoff curve.

这里列的是tokudb,用的lsm tree,没啥说的

Module 2 continued: Write-optimized data structures perform writes much faster than point queries; this asymmetry affects the design of an ACID compliant database.

这里提到了mongo用的Fractal-Tree Index 没听说过这数据结构

Module 3: Case study – TokuFS. How to design and build a write-optimized file systems.

介绍tokufs,读写指标吊锤ext4

论文在这里

实现细节

  • metadata index data block index 加速
  • metadata index key记录文件名,data block index记录文件名和blocknum 连续读
  • blocksize固定512
  • 压缩索引
    • 路径名字前缀非常多余,可以优化移除
    • zero-padding,很多块占用用了padding,可以移除(?有没有安全风险?)
  • 原型阶段,不知道谁用了

Module 4: Page-replacement algorithms. We give relevant theorems on the performance of page-replacement strategies such as LRU.

讨论缓存有效性问题,引入各种cache组件,比如LRU

讨论最佳替换算法,以及竞争性分析,在线算法竞争性分析可以看这篇文章 也放在参考链接里了

具体的概念就不展开了,直接说结论

LRU LFU FIFO k-competitive

基本上LRU和内存(OPT)表现一致,多了一些内存浪费

大段时间都在证明上

还有一些需要考证的问题

  • 如果block大小不一,性能表现如何?
  • 写回(write-back)的代价
  • LRU实现起来 代价稍高(调用系统时间,其实这不算什么问题)

Module 5: Index design, including covering indexes.

b树索引加速查询但是影响插入,维护索引代价不大,所以如何索引需要考虑清楚

  • 索引缩小数据规模
  • 提高局部性
  • 排序

Module 6: Log-structured merge trees and fractional cascading.

介绍LSM tree以及LSM tree在DAM模型上的表现

如何提高点查效率

  • 缓存
  • 不聋过滤器 Bloom filter
  • fractional cascading.(?啥意思)

以及LSM加优化之后和COLA差不多

LSM tree + forward + ghost = COLA

没看懂细节 总之tokudb论文里有

还有buffer tree之类的都是对btree的优化。这里不展开了

Module 7: Bloom filters.

读完感觉没有参考资料有可读性。毕竟比较旧了,2012年的,还是挺有前瞻性的

参考资料

  • 需要了解cache-bolivious 概念 https://users-cs.au.dk/gerth/emF03/slides/cacheoblivious.pdf
  • 一个CO的简单优化,就是分治 https://blog.csdn.net/toughbro/article/details/5931029

考量cache oblivious最好是对比完全不考虑memory hierarchy结构的算法复杂度测量机制,O(nlogn)这样的,只是计数计算的复杂度。或者在console上常常做的cache aware的优化,就是针对cache line size来组织数据结构大小,一次prefetch一个cache line的数据做操作。这个cache oblivious比理想算法更接近于电脑硬件(考虑到memory hierarchiy)但也没有变态到完全根据cache line size来设计数据结构和算法。简单说来,就是假设一个cache line size,对问题进行分而治之,分的粒度到virtual cache line size,就停止分解

  • 和我第一小节差不多 https://www.jianshu.com/p/8bfb47c01a7e
  • 随便搜co搜到一篇论文 https://www.cse.ust.hk/catalac/papers/coqp_tods08.pdf
  • 算法介绍 https://blog.csdn.net/dc_726/article/details/51724097
    • 第五小结,介绍了具体的优化算法,以及列出了很多论文,不错
    • 第四小结,写优化数据结构,除了LSM tree还有很多,提供思路
  • 竞争性分析,建议看这篇文章 https://blog.csdn.net/anshuai_aw1/article/details/108467900 写的不错
  • tokudb有很多点子,催生了很多想法
    • 写优化数据库 https://github.com/weicao/cascadb
    • fractal-tree数据库 https://github.com/BohuTANG/nessDB
      • 另外,这个兄弟的博客不错,对于了解CK来说。值得看一看 https://bohutang.me/2020/06/05/clickhouse-and-friends-development/

Read More

(译)Scaling Cache Infrastructure at Pinterest


原文链接

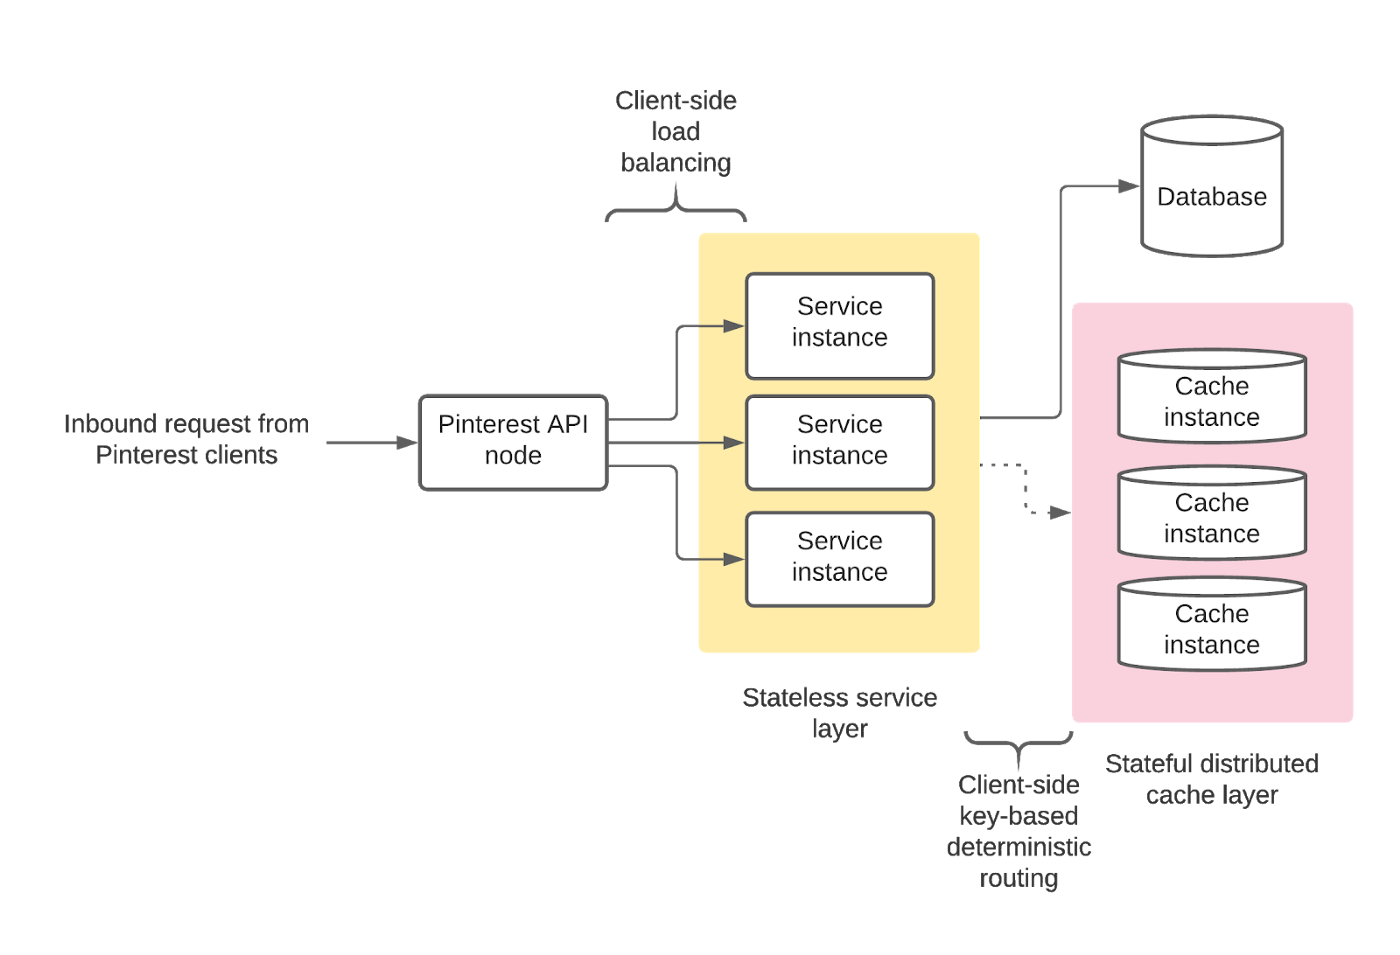
需求,业务激增,缓存不够,要分布式缓存

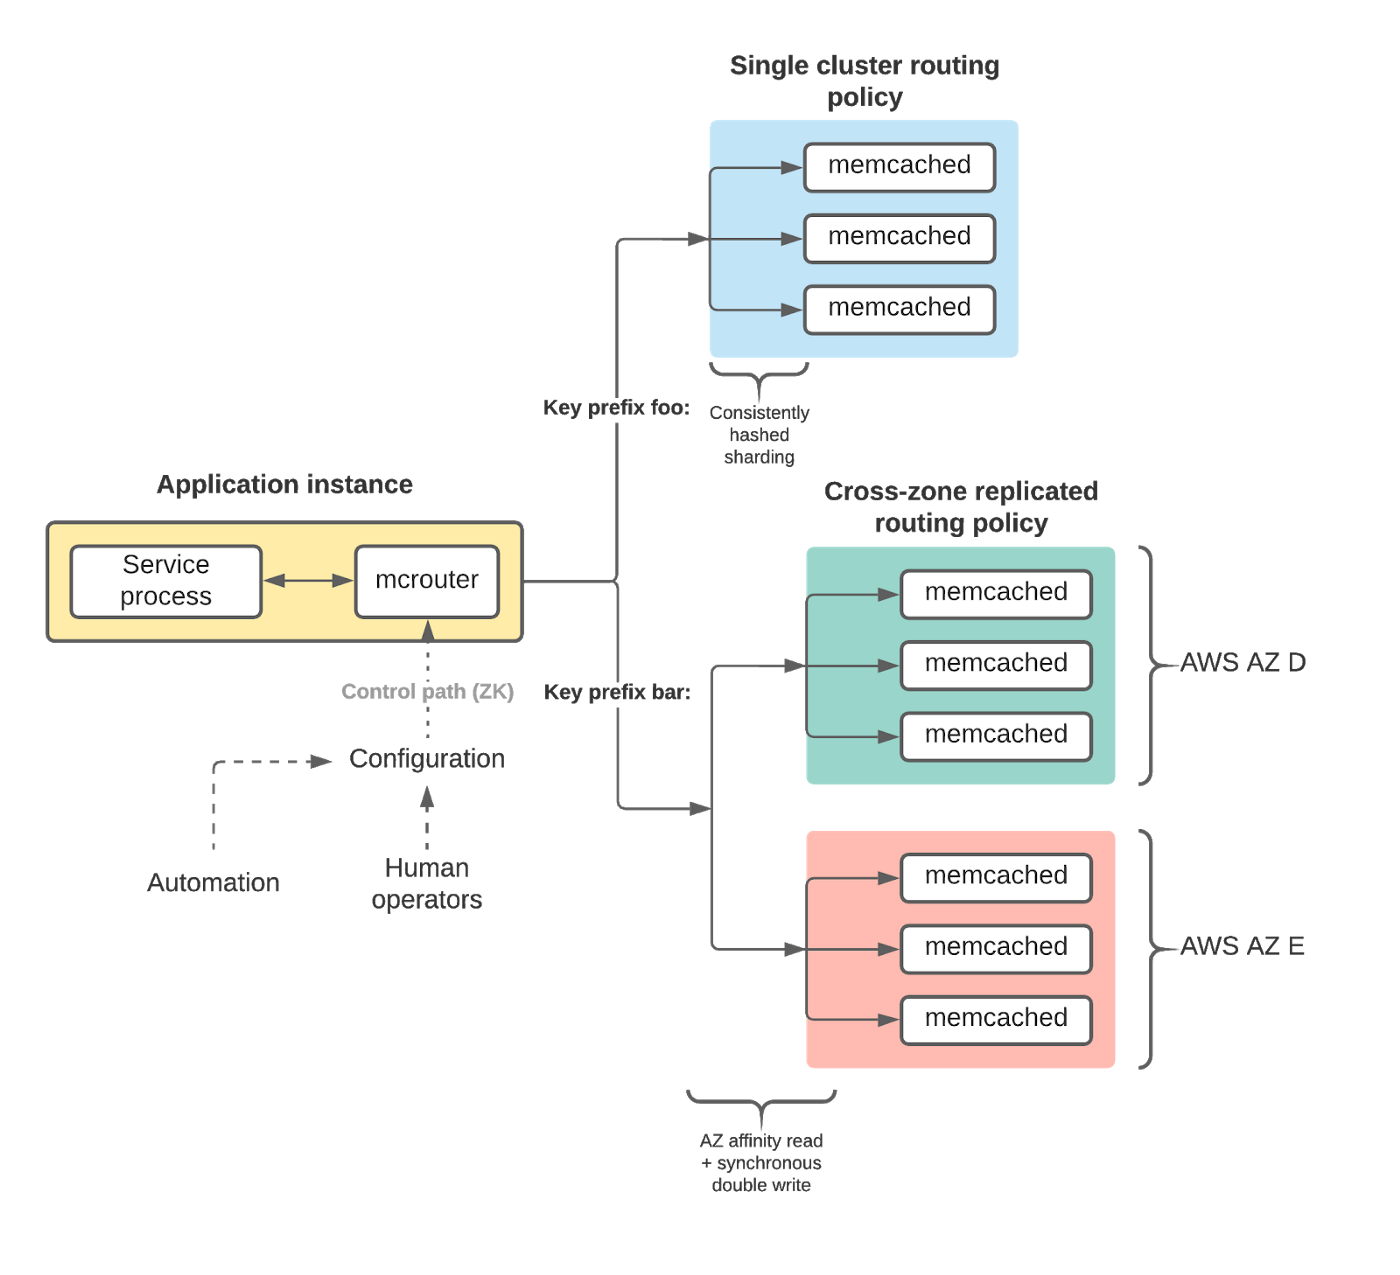
pinterest的业务架构图

分布式缓存,使用mcrouter + memcache架构,facebook的方案,他们还发了paper

memcache可以开启extstore,如果数据过大放不下,可以保存到硬盘里,flash nvme之类的

mcrouter的抽象能力非常好

  • 解藕数据面控制面
  • 提供上层更精细的控制 修改ttl之类

这套方案mcrouter也高可用

  • 背后的复制行为对上层来说也是透明的 双活等等
  • 也可以接入测试流量,更好的隔离流量

主要风险

  • 配置文件容易出错
  • 瓶颈在proxy 得多个proxy
  • 尽管业务侧可以灵活的设计key,热点key问题还是不可避免 (有没有mongodb的那种分裂range机制?如果没有,能引入吗?)

说实话这个软文没讲什么东西


PS

我浏览的途中又一次看了眼beandb,原来也是mc的协议啊

一个db的列表 https://github.com/sdcuike/issueBlog/blob/master/%E5%AD%98%E5%82%A8%E5%BC%95%E6%93%8E.md

https://github.com/alibaba/tair


Read More

(译)对于模版类,尽可能的使用Hidden Friend函数定义operator,而不是放在外侧当成模版方法


原文链接

两种比较实现

一种是通用的模版方法

template<class V>
struct Cat {
    V value_;
};

template<class V>
bool operator<(const Cat<V>& a, const Cat<V>& b) {
    return a.value_ < b.value_;
}

另一种是友元函数

template<class V>
struct Dog {
    V value_;

    friend bool operator<(const Dog& a, const Dog& b) {
        return a.value_ < b.value_;
    }
};

这也叫Hidden Friend 惯用法,更推荐这种写法,比如这种场景

template<class T>
void sort_in_place(const std::vector<T>& vt) {
    std::vector<std::reference_wrapper<const T>> vr(vt.begin(), vt.end());
    std::sort(vr.begin(), vr.end());
    std::transform(vr.begin(), vr.end(),
        std::ostream_iterator<int>(std::cout), std::mem_fn(&T::value_));
}

使用reference_wrapper,增加一层,对于sort比较,通过ADL找对应的operator < , 推导失败,(Godbolt.)

opt/compiler-explorer/gcc-snapshot/lib/gcc/x86_64-linux-gnu/11.0.0/../../../../include/c++/11.0.0/bits/predefined_ops.h:43:23: error: invalid operands to binary expression ('std::reference_wrapper<const Cat<int>>' and 'std::reference_wrapper<const Cat<int>>')
      { return *__it1 < *__it2; }
               ~~~~~~ ^ ~~~~~~

对于Dog类,用到friend方法,能隐式把 const Dog<int>& 转换reference_wrapper<Dog<int»

对于Cat类,operator < 需要具体的类型来推导,否则直接报错

这个技巧也叫Barton–Nackman trick

标准库的写法通常都是Cat,reference_wrapper 也是后加的,大部分没有sort_in_place这种需求


Read More

(译)还是讨论folly的静态注入技术:合法访问私有成员函数


原文链接

需求,不改动Foo类的前提下访问bar和x,即使他们是private

// foo.h
#pragma once
#include <iostream>

class Foo {
    int bar() const {
        std::cout << __PRETTY_FUNCTION__;
        return x;
    }

    int x{42};
};

先是总结了一遍folly的技术

// access_private_of_foo.h
#pragma once
#include "foo.h"

// Unique namespace in each TU.
namespace {
// Unique type in each TU (internal linkage).
struct TranslationUnitTag {};
}  // namespace

// 'Foo::bar()' invoker.
template <typename UniqueTag,
          auto mem_fn_ptr>
struct InvokePrivateFooBar {
    // (Injected) friend definition.
    friend int invoke_private_Foo_bar(Foo const& foo) {
        return (foo.*mem_fn_ptr)();
    }
};
// Friend (re-)declaration.
int invoke_private_Foo_bar(Foo const& foo);

// Single explicit instantiation definition.
template struct InvokePrivateFooBar<TranslationUnitTag, &Foo::bar>;

// 'Foo::x' accessor.
template <typename UniqueTag,
          auto mem_ptr>
struct AccessPrivateMemFooX {
    // (Injected) friend definition.
    friend int& access_private_Foo_x(Foo& foo) {
        return foo.*mem_ptr;
    }
};
// Friend (re-)declaration.
int& access_private_Foo_x(Foo& foo);

// Single explicit instantiation definition.
template struct AccessPrivateMemFooX<TranslationUnitTag, &Foo::x>;

这个代码更清晰一点,之前也谈到过,见这篇文章

现在是2020年了,考虑c++20的做法

C++20 implemented P0692R1 (Access Checking on Specializations), summarized in P2131R0 (Changes between C++17 and C++20 DIS) as

This change fixes a long-standing, somewhat obscure situation, where it was not possible to declare a template specialization for a template argument that is a private (or protected) member type. For example, given class Foo { class Bar {}; };, the access Foo::Bar is now allowed in template<class> struct X; template<> struct X<Foo::Bar>;.

特化模版,模版参数可以填private/protected成员函数, 也就规避了显式实例化,保留原来的特化即可

回到这个函数接口,原来的友元技术不变,只是去掉显式实例化

// accessprivate.h
#pragma once
template <auto mem_ptr>
struct AccessPrivate
{
    // kMemPtr is intended to be either a pointer to a private
    // member function or pointer to a private data member.
    static constexpr auto kMemPtr = mem_ptr;
    struct Delegate;  // Define only in explicit specializations.
};
// access_private_of_foo_cpp20.h
#pragma once
#include "accessprivate.h"
#include "foo.h"

// Specialize the nested Delegate class for each private
// member function or data member of Foo that we'd like to access.

template <>
struct AccessPrivate<&Foo::bar>::Delegate {
    // (Injected) friend definition.
    friend int invoke_private_Foo_bar(Foo const& foo) {
        return (foo.*kMemPtr)();
    }
};
// Friend (re-)declaration.
int invoke_private_Foo_bar(Foo const& foo);

template <>
struct AccessPrivate<&Foo::x>::Delegate {
    // (Injected) friend definition.
    friend int& access_private_Foo_x(Foo& foo) {
        return foo.*kMemPtr;
    }
};
// Friend (re-)declaration.
int& access_private_Foo_x(Foo& foo);

注意这里,声明了Delegate,只特化需要的注入访问接口,之前的显式实例化,以及匿名空间Tag(TU唯一)都去掉了。加了一层Delegate

用宏整理一下

// accessprivate/accessprivate.h
#pragma once

namespace accessprivate {
template <auto mem_ptr>
struct AccessPrivate
{
    // kMemPtr is intended to be either a pointer to a private
    // member function or pointer to a private data member.
    static constexpr auto kMemPtr = mem_ptr;
    struct Delegate;  // Define only in explicit specializations.
};

}  // namespace accessprivate

// DEFINE_ACCESSOR(<qualified class name>, <class data member>)
//
// Example usage:
//   DEFINE_ACCESSOR(foo::Foo, x)
//
// Defines:
//   auto& accessprivate::get_x(foo::Foo&)
#define DEFINE_ACCESSOR(qualified_class_name, class_data_member)\
namespace accessprivate {\
template <>\
struct AccessPrivate<&qualified_class_name::class_data_member>::Delegate {\
    friend auto& get_##class_data_member(\
        qualified_class_name& obj) { return obj.*kMemPtr; }\
};\
auto& get_##class_data_member(qualified_class_name& obj);\
}

这样写getter setter更简单

#include <iostream>
#include "accessprivate/accessprivate.h"

namespace bar {

struct Bar {
    int getX() const { return x; }
    int getY() const { return y; }
private:
    int x{42};
    int y{88};
};

}  // namespace bar

DEFINE_ACCESSOR(bar::Bar, x)
// -> accessprivate::get_x(Bar&)
DEFINE_ACCESSOR(bar::Bar, y)
// -> accessprivate::get_y(Bar&)

void demo() {
    bar::Bar b{};
    accessprivate::get_x(b) = 13;
    accessprivate::get_y(b) = 33;
    std::cout << b.getX() << " " << b.getY();  // 13 33
}

作者已经写了仓库 c++17可用


ref

  • 原文中列出了一些c++的标准中对应的描述,这里不列举了,不仔细追究什么符号查找之类的限定了
  • 作者的博客很值得一读,老语言律师了
  • 还有一个讨论,技巧和folly一样,不多说了 https://quuxplusone.github.io/blog/2020/12/03/steal-a-private-member/

Read More

^